Learning Distributed Tracing with Wavefront Part-6
· 14 min read
This is the sixth installment of the Learning Distributed Tracing with Wavefront series.
Series
Part 1 : Overview
Part 2 : Distributed tracing with Spring Boot
Part 3 : What are RED metrics?
Part 4 : Connecting services together
Part 5 : Distributed tracing with Python
Part 6 : Distributed tracing with AMQP ← you are here
Part 7 : Distributed tracing with a service mesh
Introduction
Past installments covered distributed tracing with Spring Boot and Python. To review once more:
- The crux of distributed tracing is the Trace ID and Span ID
- Services get connected by sharing Trace IDs and Span IDs via HTTP headers
- The application must include code that unpacks the Trace ID and Span ID from the HTTP headers
Regarding the second point — all our verification so far has been based on "HTTP requests". So a question may arise: does this work for "non-HTTP requests" too?
This time we use RabbitMQ to verify whether distributed tracing also works over AMQP.
Preparation
We use RabbitMQ this time, so install it on your PC. The steps differ per OS; install and start it based on:
https://www.rabbitmq.com/download.html
We'll write Spring Boot apps that put messages onto and take messages off RabbitMQ. As before, install at minimum:
- Java JDK 8+
Install the JDK following Oracle JDK.
Source code
Published here:
https://github.com/mhoshi-vm/wf-demanabu-dis-tracing/tree/master/6
Preparing the apps
Two apps are needed: a Producer app and a Consumer app.
Producer app
Since we're on Part 6 now, instead of downloading from start.spring.io as before, we download the needed packages directly using the CLI:
curl https://start.spring.io/starter.tgz \
       -d artifactId=producer \
       -d baseDir=producer \
       -d dependencies=web,amqp,cloud-starter-sleuth,wavefront \
       -d packageName=com.example \
       -d applicationName=ProducerApplication | tar -xzvf -
Success looks like this output:
x producer/.mvn/
x producer/.mvn/wrapper/
x producer/.mvn/wrapper/maven-wrapper.properties
x producer/.mvn/wrapper/MavenWrapperDownloader.java
x producer/.mvn/wrapper/maven-wrapper.jar
x producer/.gitignore
x producer/HELP.md
x producer/mvnw.cmd
x producer/src/
x producer/src/main/
x producer/src/main/resources/
x producer/src/main/resources/templates/
x producer/src/main/resources/application.properties
x producer/src/main/resources/static/
x producer/src/main/java/
x producer/src/main/java/com/
x producer/src/main/java/com/example/
x producer/src/main/java/com/example/producer.java
x producer/src/test/
x producer/src/test/java/
x producer/src/test/java/com/
x producer/src/test/java/com/example/
x producer/src/test/java/com/example/producerTests.java
x producer/pom.xml
We add two pieces of code to this.
First create a file producer/src/main/java/com/example/ProducerRestController.java with the following:
package com.example;

import java.util.Map;

import org.slf4j.Logger;
import org.slf4j.LoggerFactory;
import org.springframework.beans.factory.annotation.Autowired;
import org.springframework.http.ResponseEntity;
import org.springframework.web.bind.annotation.GetMapping;
import org.springframework.web.bind.annotation.RequestHeader;
import org.springframework.web.bind.annotation.RestController;

@RestController
public class ProducerRestController {

        private static final Logger LOGGER = LoggerFactory.getLogger(ProducerRestController.class);

        @Autowired
        Producer producer;

        @GetMapping("/amqp")
        public ResponseEntity<String> hello (@RequestHeader Map<String, String> header){
                printAllHeaders(header);
            producer.send();
            return ResponseEntity.ok("Hello World!");
        }

        private void printAllHeaders(Map<String, String> headers) {
                headers.forEach((key, value) -> {
                        LOGGER.info(String.format("Header '%s' = %s", key, value));
                });
        }
}
Then create producer/src/main/java/com/example/Producer.java:
package com.example;

import org.springframework.amqp.core.Queue;
import org.springframework.amqp.rabbit.core.RabbitTemplate;
import org.springframework.beans.factory.annotation.Autowired;
import org.springframework.context.annotation.Bean;
import org.springframework.stereotype.Component;

@Component
public class Producer{

    @Bean
    public Queue hello() {
        return new Queue("hello");
    }

    @Autowired
    private RabbitTemplate template;

    @Autowired
    private Queue queue;

    public void send() {
        String message = "Hello World!";
        this.template.convertAndSend(queue.getName(), message);
        System.out.println(" [x] Sent '" + message + "'");
    }
}
Finally update producer/src/main/resources/application.properties to:
spring.application.name=producer

management.endpoints.web.exposure.include=wavefront
server.port=8086

wavefront.application.name=demo6
wavefront.application.service=producer

spring.rabbitmq.host=localhost
Consumer app
Now build the Consumer app. First run this curl command:
curl https://start.spring.io/starter.tgz \
       -d artifactId=consumer \
       -d baseDir=consumer \
       -d dependencies=web,amqp,cloud-starter-sleuth,wavefront \
       -d packageName=com.example \
       -d applicationName=ConsumerApplication | tar -xzvf -
Add consumer/src/main/java/com/example/Consumer.java to it:
package com.example;

import java.util.Map;

import org.slf4j.Logger;
import org.slf4j.LoggerFactory;
import org.springframework.amqp.rabbit.annotation.RabbitHandler;
import org.springframework.amqp.rabbit.annotation.RabbitListener;
import org.springframework.messaging.handler.annotation.Headers;
import org.springframework.messaging.handler.annotation.Payload;
import org.springframework.stereotype.Component;

@Component
@RabbitListener(queues = "hello")
public class Consumer {

    private static final Logger LOGGER = LoggerFactory.getLogger(Consumer.class);

    @RabbitHandler
    public void receive(@Payload String body, @Headers Map<String,Object> headers) {
		LOGGER.info(String.format(" [x] Received '" + body + headers + "'"));
    }

}
Finally update consumer/src/main/resources/application.properties to:
spring.application.name=consumer

management.endpoints.web.exposure.include=wavefront
server.port=18086

wavefront.application.name=demo6
wavefront.application.service=consumer

spring.rabbitmq.host=localhost
Starting the apps
Once ready, start the apps. First, RabbitMQ needs to be running. This differs by OS; I'm on a Mac, so:
/usr/local/sbin/rabbitmq-server
Next start the Producer app:
cd producer
./mvnw spring-boot:run
Then start the Consumer app:
cd ..
cd consumer
./mvnw spring-boot:run
With both running, curl this URL:
curl localhost:8086/amqp
If it works, you should see [x] Sent 'Hello World!'.
Run curl a few times over a while.
Then, after a bit, access:
http://localhost:8086/actuator/wavefront
And select Applications > Application Map(Beta).
If it worked, things connect like this:
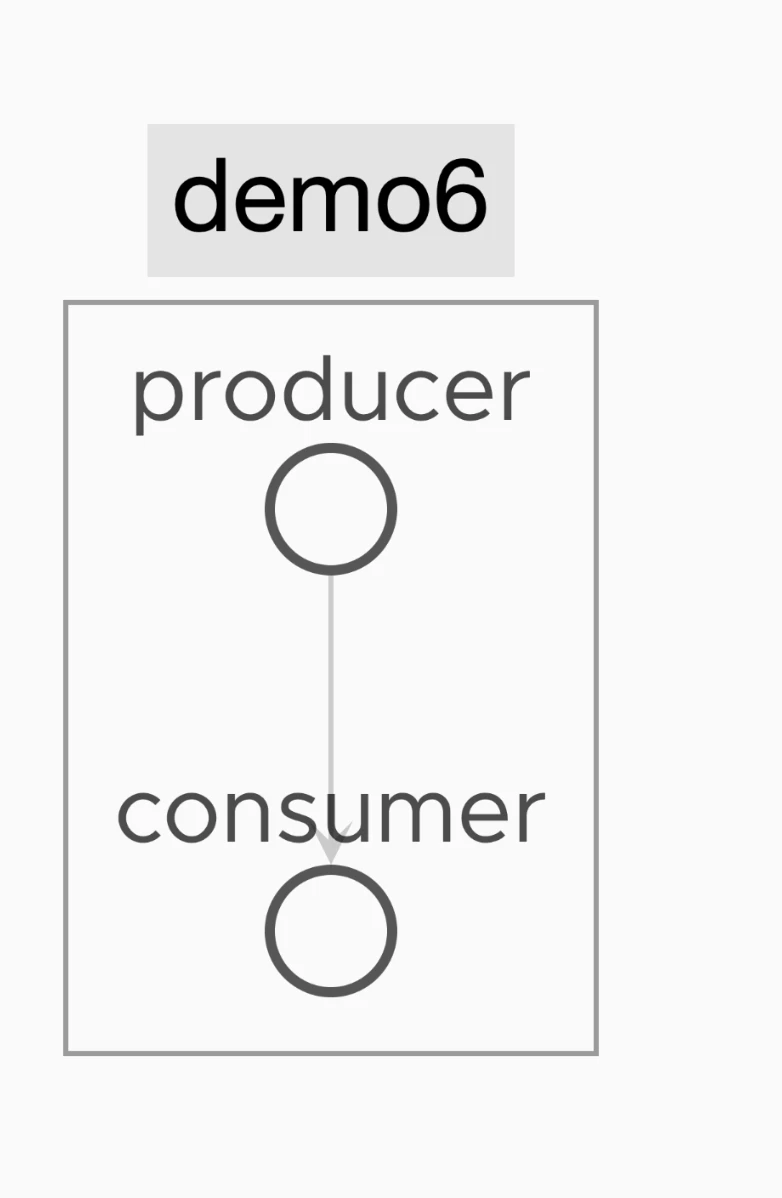
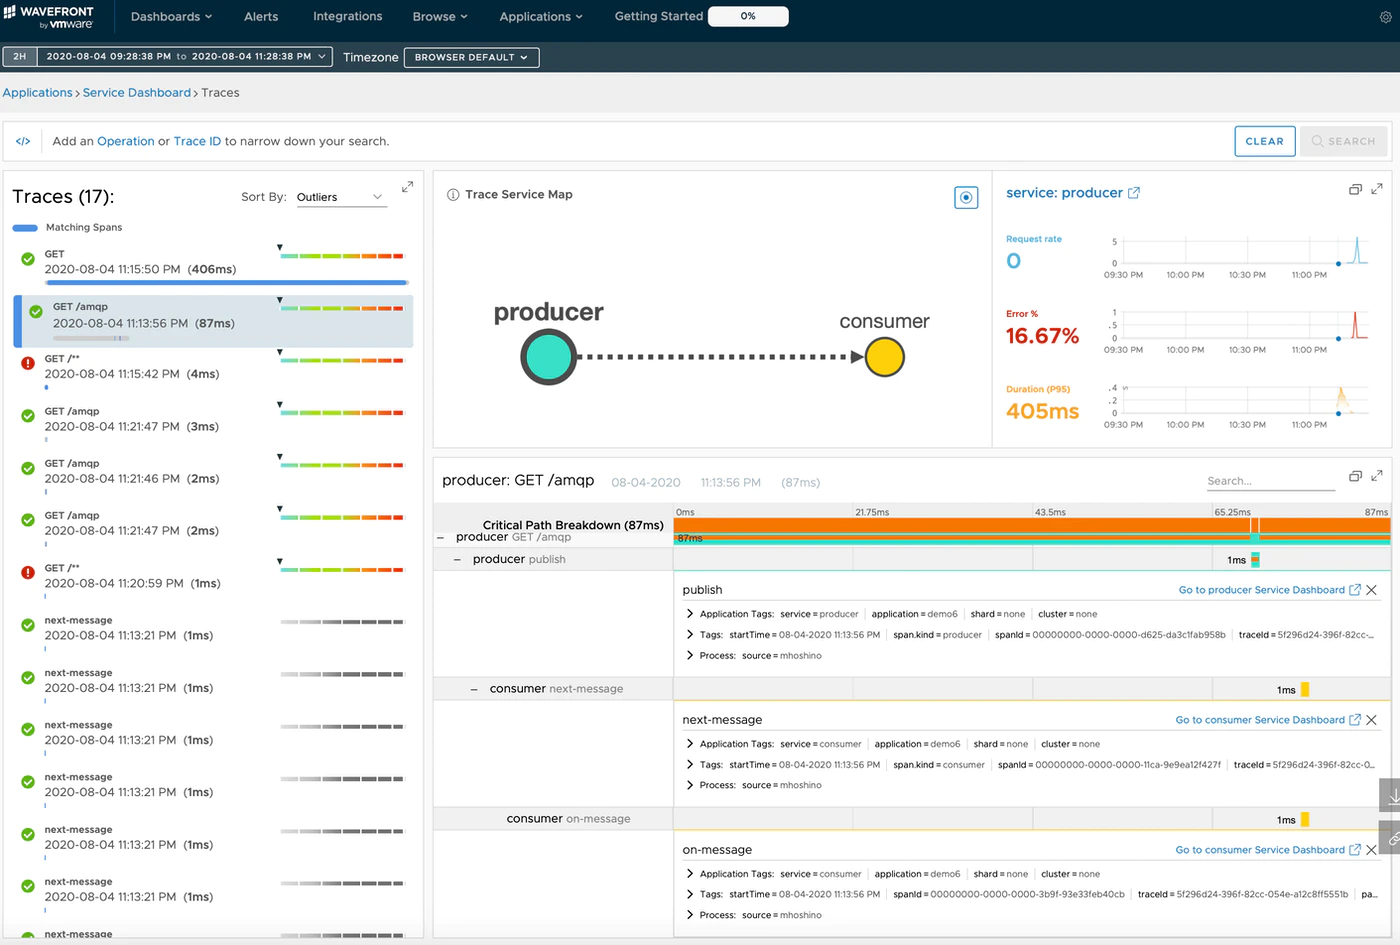
In other words — distributed tracing works over AMQP too. Looking at Applications > Traces, the objects are connected with matching Trace IDs:
What's happening?
You're probably wondering what on earth is going on, so let me explain. First, to make the situation clearer, stop the Consumer app (Ctrl + c).
With the Producer app still running, run this about three times:
curl localhost:8086/amqp
In this state, log into the RabbitMQ management console:
http://localhost:15672/#/ User/password is guest/guest.
After logging in, the Queue tab shows that the hello Queue has accumulated as many messages as the number of curls:
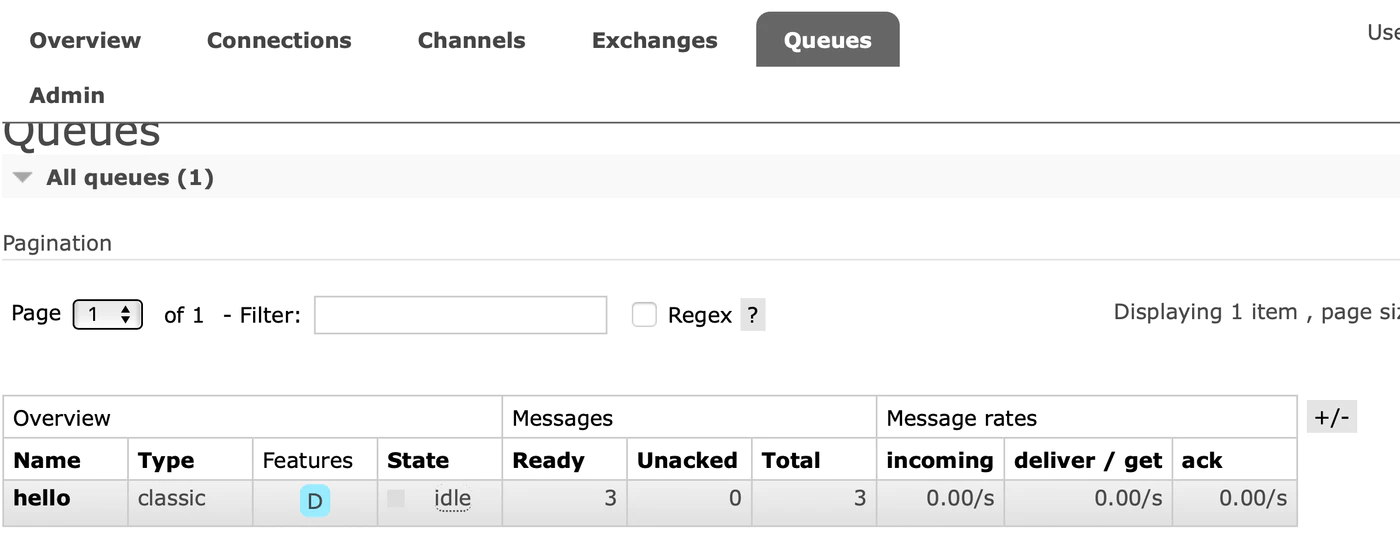
So the Producer app is a very simple app that pushes a message onto the hello queue on every curl.
The Consumer app, on the other hand, reads messages off that hello queue.
What about the x-b3 headers?
As repeated since last time, x-b3 headers are the mechanism for exchanging Trace IDs and such. How does AMQP do this?
From the management console, select the hello queue and choose Get Messages.
The message contains a b3 header:
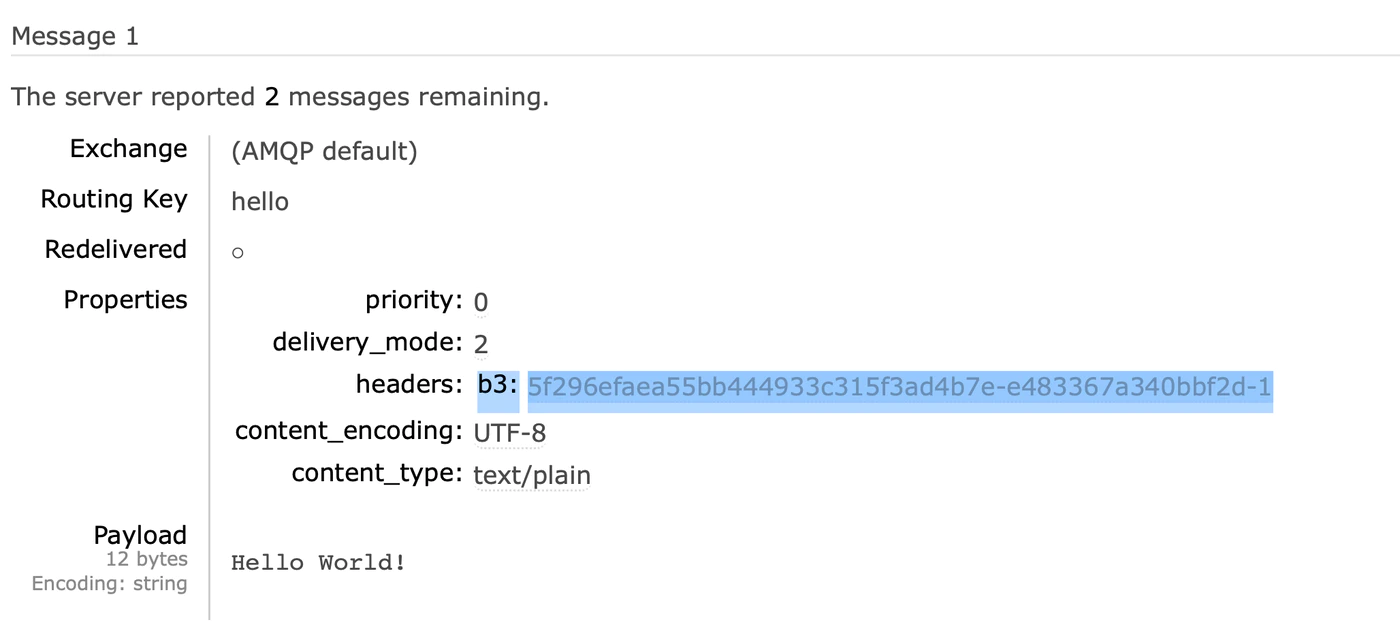
So AMQP also exchanges Trace IDs via headers.
And again, this is thanks to Sleuth doing it transparently in the Spring Boot case:
Summary
- Distributed tracing works over AMQP too
- AMQP also exchanges Trace IDs and the like via headers
- With Spring Boot, tracing remains transparent to your code
Next time, at last: "Distributed tracing with a service mesh".