fileTree を利用した build.gradle に Application Advisor をかけるメモ
· 17 分で読めます
閉域網でつくられた build.gradle には独特な特徴があり、Application Advisor で使えるようにするには準備が必要です。
今回はfileTreeを使ってしまった例です。
イントロダクション
Application Advisor は、この記事で紹介したように Spring だけでない Java を常に最新の状態に保つためのツールです。
https://notes.lespaulstudioplus.info/posts/50 https://notes.lespaulstudioplus.info/posts/51
Application Advisor が軌道にのってしまえば、アプリケーションの最新化に役立ちますが、最初のループが想像以上に大変になってしまう場合があります。
このブログでは、その中でも「fileTree を利用した build.gradle 」を Application Advisor で回すためのテクニックを紹介します。
「fileTree を利用した build.gradle」って何?
端的にいうとこんな build.gradle です。
dependencies {
    implementation fileTree(dir: 'lib', include: ['*.jar'])
}
これは、閉域網など Jar ファイルをネットワーク上でホストするためのレポジトリがない環境でよく見られる書き方です。 以下の特徴を持っています。
fileTreeを使い依存関係のライブラリをローカルファイルシステムlib/というディレクトリから読み取る- その
lib/に配置された jar ファイルをワイルドカード'*.jar'で定義している(もしくは、個別のファイル指定の場合もありうる)
Gradle としては、これは問題なくコンパイルしてしまいます。
しかし、fileTree で読み込まれた jar は Gradle の依存関係グラフ上ではただのファイルパスであり、group / artifact / version を持ちません。
そのため Application Advisor としては、このままだと advisor build-config get や advisor upgrade-plan get の段階でアップグレードするべき対象の依存関係をリストアップできず、実行したとしても中途半端な実行結果になってしまいます。
これを乗り越えるために、以下の手順で build.gradle を直す必要があります。
- build.gradle から fileTree をなくしていく
- リモート Maven レポジトリを用意して、Application Advisor を実行
この流れを解説していきます。
なお、fileTree は gradle 固有のものであり、Maven を使っている場合は該当しない機能となります。
とはいえ、Maven でもこういった閉域網特有の書き方があるので、今後ブログにしていきます。
build.gradle から fileTree をなくしていく
fileTree のままだと、Application Advisor が依存関係の識別子を理解できません。
lib にある jar ファイルから、記載すべきGAV(group,artifact,version)を導き出して一覧していく必要があります。
機械的にやる場合以下の流れになります。
- jar ファイルの中に
META-INF/maven/<group>/<artifact>/pom.propertiesが存在する場合、そのファイルからGAVを導き出す - 上記がない場合(Spring や Spring Boot のように Gradle でビルドされたものなど、Maven 以外でビルドされた jar)は、Jar の SHA-1 値と Maven Central を照らし合わせて算出をする。
なお、後者を行うには Maven Central にアクセスできる端末で実行する必要があります。
まず、以下のスクリプトで pom.properties を探し読み解きに行きます。
スクリプト名は ./jar-coords.sh とします。
#!/usr/bin/env bash
# Print group:artifact:version for every jar in a folder, the first step of
# turning a `fileTree(dir: 'lib')` build into one coordinate per jar. Needs no
# network, so it runs inside the air-gapped site.
#
#   1. Maven writes META-INF/maven/<group>/<artifact>/pom.properties into every
#      jar it builds; read it. A shaded jar carries several, so prefer the one
#      whose artifactId matches the file name.
#   2. Jars not built by Maven (Spring and Boot use Gradle; Tomcat and Lombok
#      use Ant) have none. They are printed as "?? <jar> sha1=<hash>" for
#      sha1-lookup.sh to resolve.
#
# flatDir finds a jar only by <artifactId>-<version>.jar, so a coordinate whose
# jar is named otherwise gets a "# RENAME" note.
set -euo pipefail
dir=${1:-lib}
for j in "$dir"/*.jar; do
  f=$(basename "$j")
  props=$(unzip -Z1 "$j" 2>/dev/null | grep -E '^META-INF/maven/[^/]+/[^/]+/pom\.properties$' || true)
  best=""
  for p in $props; do
    [[ $f == "$(cut -d/ -f4 <<< "$p")-"* ]] && best=$p && break
  done
  [[ -z $best ]] && best=$(head -1 <<< "$props")
  if [[ -n $best ]]; then
    unzip -p "$j" "$best" | tr -d '\r' | awk -F= -v f="$f" '
      /^groupId=/ {g = $2} /^artifactId=/ {a = $2} /^version=/ {v = $2}
      END {print g ":" a ":" v (f == a "-" v ".jar" ? "" : "   # RENAME to " a "-" v ".jar")}'
  else
    echo "?? $f sha1=$(shasum "$j" | cut -d' ' -f1)"
  fi
done | sort
例えば以下のように実行します。(こちらはインターネットなくても実行が可能)
./jar-coords.sh lib > coords.txt
すると、以下のように解決できた依存関係が出力され、pom.properties が存在しなかった jar ファイルは先頭に "??" がついて出力されます。
?? spring-boot-2.7.2.jar sha1=a471deae9d806afa28ab888f75d46cff6e2f118c
org.apache.logging.log4j:log4j-api:2.17.2
次に以下のようなスクリプトを用意します。これは、SHA-1 値から目的の依存関係のGAV値を取り出します。
ファイル名は、./sha1-lookup.sh とします。
#!/usr/bin/env bash
# Resolve the "?? <jar> sha1=<hash>" lines jar-coords.sh prints, by asking
# Maven Central which artifact has that SHA-1. Run it on a machine WITH network
# access; only file names and hashes leave the site.
#
#   grep '^??' coords.txt | ./sha1-lookup.sh
#
# A jar Central does not know is internal or patched: give it a coordinate of
# your own and name the file to match.
set -euo pipefail
while read -r _ jar sha; do
  sha=${sha#sha1=}
  id=$(curl -sSf "https://search.maven.org/solrsearch/select?q=1:$sha&wt=json" \
    | python3 -c 'import sys, json; d = json.load(sys.stdin)["response"]["docs"]; print(d[0]["id"] if d else "")')
  echo "${id:-?? $jar not on Central}"
done
そして、以下のように実行して GAV 値を取り出します。(これは Maven Central へのアクセスが必須)
grep '^??' coords.txt | ./sha1-lookup.sh
結果として、以下のような値が取れます。
org.springframework.boot:spring-boot:2.7.2
なお、search.maven.org/solrsearch は Maven Central の旧来の検索 API であり(現在は central.sonatype.com に移行中)、応答が不安定なことがあります。
失敗する場合は時間をおいて再実行してください。
そしてbuild.gradle を以下のように書き直します。
repositories {
    flatDir {
        dirs 'lib'
    }
}

dependencies {
    implementation 'org.apache.logging.log4j:log4j-api:2.17.2'
    implementation 'org.springframework.boot:spring-boot:2.7.2'
}
ポイントとしては以下です。
lib/をfileTreeと指定するのではなく、repositoriesのflatDirにして、ローカルレポジトリとして指定をするdependenciesで先ほどの手順で見つかった依存関係をすべて明示指定していくflatDirは group を無視し、<artifactId>-<version>.jarというファイル名で jar を探します。Gradle 的には group は何を書いても動きますが、Application Advisor は group も含めて依存関係を識別するので、正しい group を書く必要があります
さらにtransitive = false のオプションの追加が推奨されます。
これは、推移的依存関係の検索を止めるものです。
flatDir 自体は POM を持たないため推移的依存関係は解決されませんが、mavenLocal() やミラーなど POM を持つレポジトリが混在すると、lib/ にない推移的依存関係の取得が走ります。
ローカルに Jar ファイルをコピーしている場合、大抵は必要最小限のもののみを転送しているので、この際、不足分が lib/ にないとオフラインビルドが失敗します。その予防となります。
allprojects {
    configurations.all {
        transitive = false
    }
}
buildscript の fileTree もなくしていく
dependencies だけでなく、Gradle プラグイン自体も fileTree で読み込んでいるケースがよくあります。
通常、ネットワークがある環境での古い書き方は以下のように classpath 1 行で済みます。
プラグインが必要とする jar は、プラグインの POM から推移的に解決されます。
buildscript {
    repositories {
        mavenCentral()
    }
    dependencies {
        classpath 'org.springframework.boot:spring-boot-gradle-plugin:2.7.2'
    }
}

apply plugin: 'java'
apply plugin: 'org.springframework.boot'
apply plugin: 'io.spring.dependency-management'
これが閉域網では、以下のように fileTree になっていることがあります。
buildscript {
    dependencies {
        classpath fileTree(dir: 'lib', include: ['*.jar'])
    }
}

apply plugin: 'java'
apply plugin: 'org.springframework.boot'
apply plugin: 'io.spring.dependency-management'

dependencies {
    implementation fileTree(dir: 'lib', include: ['*.jar'])
}
Gradle 的にはこれでも動きます(fileTree なので repositories すら不要です)。
しかし、Spring Boot のアップグレードでは Spring Boot Gradle プラグインのバージョンも上げる必要があり、プラグインのバージョンが jar のファイル名にしか存在しない状態では、Application Advisor はそれを認識も書き換えもできません。
そのままだと、ライブラリは Spring Boot 3 に上がったのに、プラグインは 2.7 のまま、という中途半端な状態になってしまいます。
こちらも dependencies と同様に GAV で書き直します。
buildscript {
    repositories {
        flatDir { dirs 'lib' }
    }
    configurations.classpath { transitive = false }
    dependencies {
        classpath 'org.springframework.boot:spring-boot-gradle-plugin:2.7.2'
        classpath 'io.spring.gradle:dependency-management-plugin:1.0.12.RELEASE'
        classpath 'org.springframework.boot:spring-boot-loader-tools:2.7.2'
        classpath 'org.springframework:spring-core:5.3.22'
        classpath 'org.apache.commons:commons-compress:1.21'
        // ...その他プラグインが必要とする jar
    }
}
ポイントとしては以下です。
- 本来 POM から推移的に解決されるプラグインの依存 jar も、
transitive = falseの前提ではすべて列挙する必要があります。どの jar が必要かは、ネットワークがある端末で通常のclasspath1 行のbuild.gradleに対して./gradlew buildEnvironmentを実行すると確認できます allprojects { configurations.all { ... } }はbuildscript側には効かないので、buildscriptの中でconfigurations.classpath { transitive = false }を指定しますclasspath fileTree(dir: 'lib', include: ['*.jar'])だと、アプリケーションの jar もプラグイン側のクラスパスに入っていました。逆にdependencies側にはプラグインの jar は記載しないでください
オフラインでベースラインを確認
最終的に以下のような build.gradle になります。
buildscript {
    repositories {
        flatDir { dirs 'lib' }
    }
    configurations.classpath { transitive = false }
    dependencies {
        classpath 'org.springframework.boot:spring-boot-gradle-plugin:2.7.2'
        classpath 'io.spring.gradle:dependency-management-plugin:1.0.12.RELEASE'
        classpath 'org.springframework.boot:spring-boot-loader-tools:2.7.2'
        classpath 'org.springframework:spring-core:5.3.22'
        classpath 'org.apache.commons:commons-compress:1.21'
        // ...その他プラグインが必要とする jar
    }
}

apply plugin: 'java'
apply plugin: 'org.springframework.boot'
apply plugin: 'io.spring.dependency-management'

repositories {
    flatDir {
        dirs 'lib'
    }
}

allprojects {
    configurations.all {
        transitive = false
    }
}

dependencies {
    implementation 'org.apache.logging.log4j:log4j-api:2.17.2'
    implementation 'org.springframework.boot:spring-boot:2.7.2'
    // ...jar-coords.sh / sha1-lookup.sh で見つかった残りの依存関係
}
ここまで来たら、オフラインでのビルドが成功するか確認します。
./gradlew --offline bootJar
なお、./gradlew(Gradle Wrapper)は初回に Gradle 本体をダウンロードするため、閉域網では使えないことがあります。
その場合は端末にインストール済みの gradle --offline bootJar で確認してください。
ここまで来ることでベースラインに到達しました。
なお、ここまで可能な限り汎用的な手順にはしたものの、build.gradle の書き方次第では別の工夫や応用が必要な点はご了承ください。
Application Advisor を実行
ここまで build.gradle を修正すれば、あとは Application Advisor の実行です。
なお、実行前に注意が必要なのが、Application Advisor が実行された場所から更新先の Jar ファイルが入手可能なMavenレポジトリにアクセスができる必要があります。
その際の Maven レポジトリも最小限のアップグレードのアセットではなく、基本的には公共のレポジトリのミラーとして構成されていることが強く推奨されます。
さて、ここからは Maven のレポジトリがセットできた前提となるので、以下の行を消します。
repositories {
    flatDir {
        dirs 'lib'
    }
}

allprojects {
    configurations.all {
        transitive = false
    }
}
buildscript 側の flatDir と configurations.classpath { transitive = false } も同様に消します。
なお、repositories を全て消してしまうと当然、そもそもの検索すべきレポジトリがなくなってしまいます。
そこで、Maven のレポジトリを追記する必要が出てきます。
様々な方法があるのですが、ミラーレポジトリに kagami を使えば、$HOME/.gradle/init.gradle にレポジトリを記載する方法が紹介されているので参考にしてください。
その際、buildscript(Gradle プラグインの解決)側からもミラーが参照されるようになっているかも確認してください。
https://github.com/making/kagami
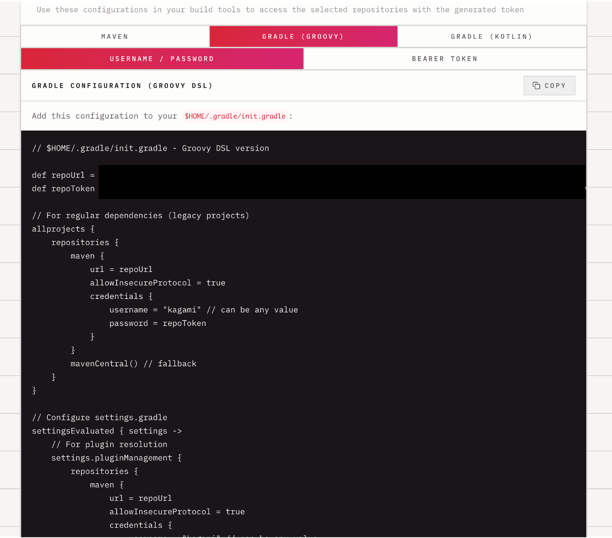
ここで transitive = false を外すと推移的依存関係が解決されるようになるため、依存関係グラフはベースラインとは変わります。
./gradlew dependencies の結果を前後で比較しておくと安心です。
また、transitive = false の前提で列挙した依存関係(例えば org.springframework:spring-core:5.3.22 のような、本来は推移的に入ってくるもの)が build.gradle に明示的なバージョン付きで残っています。
io.spring.dependency-management では、依存関係に直接書かれたバージョンが BOM より優先されるため、Spring Boot のバージョンを上げても、これらの行が古いバージョンのまま残ってしまう可能性があります。
そのため、ミラーに切り替えたタイミングで以下のいずれかを行うことをお勧めします。
- 推移的に入ってくるものを削除し、本当の直接依存(starter など)だけに絞る
- BOM が管理している依存関係からはバージョン指定を外す
ここまで来たら、--offline を指定せずともビルドができることを確認します。
./gradlew bootJar
これが成功すれば、upgrade-plan apply や patch apply を実行できるようになります。
なお、繰り返しですが、汎用的な手順にはつくっているものの、build.gradleの書き方で微調整は必要になると思われます。
まとめ
Application Advisor にとってやっかいな fileTree の対応方法について書きました。