Spring gRPC を Spring Authorization Server で認証機能をつける(client_credentials編)
· 11 分で読めます
マイクロサービスの開発に gRPC および Spring gRPC を使うのはとてもいい選択肢だと思います。 そこに Spring Framework 7 から Spring Security の標準機能になった Spring Authorization Server を 使えば gRPC をさらにセキュアにできる?ということで試してみました。
はじめに
Spring の gRPC には執筆段階では、サーバー、クライアント間に 3つの認証機能があります。
- HTTP Header
- mTLS
- OAUTH2
この中で圧倒的に楽なのは、ベーシック認証 + HTTP Header なのですが、パスワードによる接続なので安全とは言い難いです。 次の mTLS もとてもいい手段なのですが、サーバーとクライアント双方に使えるSSL鍵が必要です。(おれおれ証明書という手段もありますが) さらに執筆段階で、期限切れの証明書を扱うための以下の二つが実装されていないため、若干現実的でない印象です。
Support for gRPC server TLS certificate rotation #49833
Support for gRPC client TLS certificate rotation #49831
そこで最後の OAUTH2 です。OAUTH2は当初は「一番面倒」と思っていました。 OKTAなどの外部のIDPを利用するのは面倒ですし、自己管理の場合も keycloak をセットアップする必要があって重い腰があがりませんでした。
しかし、そこで思い出したのが、Spring Authorization Server です。 これを使えば、Springにもう一つマイクロサービスを足す感覚でOAUTH2 の構成ができそうです。
さらにgRPCのようなユースケースでは、M2M(Machine-to-Machine)のユースケースなので一切のパスワードを使わず、OAUTH2だけで認証できるのでは? と思いやってみました。
コード
コードはここです。
https://github.com/mhoshi-vm/play-w-gprc-mtls
まずは client_credentials 方式で
まずは、client_credentials 方式でやります。
- 用意するアプリは、GrpcServer, GrpcClient, OauthServer
- GrpcClient は自分がもっている client_id, client_secret を使い、OauthServer に認証をする
- OauthServer がアクセストークンを教える
- GrpcClientはそのアクセストークンを使って、GrpcServerへアクセス
- GrpcServer はそのアクセストークンが正しいものか OauthServer に確認後、GrpcClientに返答
GrpcClient                      OauthServer                     GrpcServer
    |                               |                               |
    |--(1) client_id/client_secret->|                               |
    |                               |                               |
    |<--(2) access token------------|                               |
    |                               |                               |
    |--(3) gRPC request + access token----------------------------->|
    |                               |                               |
    |                               |<--(4) validate access token---|
    |                               |                               |
    |                               |--(5) token is valid---------->|
    |                               |                               |
    |<--(6) gRPC response-------------------------------------------|
OauthServer の起動
まず、OauthServerを起動します。
cd oauth-server
./mvnw spring-boot:run -Dspring-boot.run.profiles=client_credentials
起動後、http://localhost:9000/.well-known/oauth-authorization-server にアクセスをして 応答があれば成功です。
なお、このユースケースに限って言えば、一切のコードを記載することなく対応できます。
依存関係にspring-boot-starter-security-oauth2-authorization-server を追加して、以下の properties さえ定義すれば、Oauthクライアントの登録が完了します。
Spring Authorization Server のいいところですね。
spring.security.oauth2.authorizationserver.issuer=${AUTH_SERVER_ISSUER:http://localhost:9000}
spring.security.oauth2.authorizationserver.client.grpc.registration.client-id=grpc
spring.security.oauth2.authorizationserver.client.grpc.registration.client-secret={noop}${CLIENT_SECRET:grpc}
spring.security.oauth2.authorizationserver.client.grpc.registration.client-authentication-methods=client_secret_basic
spring.security.oauth2.authorizationserver.client.grpc.registration.authorization-grant-types=client_credentials
spring.security.oauth2.authorizationserver.client.grpc.registration.redirect-uris=localhost:8080,localhost:8081
spring.security.oauth2.authorizationserver.client.grpc.registration.scopes=grpc:invoke
さて、この中で、client-secret がいわゆるパスワードになってしまうのですが、一旦はこのまま進めます。
GrpcServer の起動
gRPCサーバーを起動します。(compileは1度は必須)
cd server
./mvnw compile
./mvnw spring-boot:run -Dspring-boot.run.profiles=oauth
サーバー自体は大したことはないのですが、以下の properties で先ほど起動した oauthserver に向けています。
spring.security.oauth2.resourceserver.jwt.issuer-uri=http://localhost:9000
GrpcClient の起動
gRPCクライアントを起動します。(compileは1度は必須)
cd client
./mvnw compile
./mvnw spring-boot:run -Dspring-boot.run.profiles=oauth_client_credentials
このProfileによって、ClientCredentialsConfigurations.java が読み込まれますが、基本的には公式ドキュメントのコードをそのまま貼っているだけです。
Propertiesファイルは以下を設定しています。これもOauthServerと連携するための設定です。
spring.security.oauth2.client.provider.my-auth-server.issuer-uri=${AUTH_SERVER_ISSUER:http://localhost:9000}
spring.security.oauth2.client.registration.grpc-client.provider=my-auth-server
spring.security.oauth2.client.registration.grpc-client.client-id=grpc
spring.security.oauth2.client.registration.grpc-client.client-secret=grpc
spring.security.oauth2.client.registration.grpc-client.authorization-grant-type=client_credentials
spring.security.oauth2.client.registration.grpc-client.scope=grpc:invoke
gRPC実行
その後、以下のコマンドを打ちます。
curl localhost:8081
client側のプロンプトで以下が出力されれば、gRPC成功
message: "Hello ==> hello"
gRPCサーバー側のログをみると以下のようなものがみれるかと思います。
2026-07-16T11:56:33.377+09:00 DEBUG 65425 --- [server] [-worker-ELG-3-1] io.grpc.netty.NettyServerHandler         : [id: 0xa5b7af73, L:/127.0.0.1:9090 - R:/127.0.0.1:61960] INBOUND HEADERS: streamId=3 headers=GrpcHttp2RequestHeaders[:path: /Simple/SayHello, :authority: 0.0.0.0:9090, :method: POST, :scheme: http, te: trailers, content-type: application/grpc, user-agent: grpc-java-netty/1.80.0,
authorization: Bearer eyJraWQiOiJjMzAzMTRjNi03M2E1LTRmZGMtOWJmOC1iZDFlNTczNGJhN2IiLCJhbGciOiJSUzI1NiJ9.eyJzdWIiOiJncnBjIiwiYXVkIjoiZ3JwYyIsIm5iZiI6MTc4NDE3MDU5Mywic2NvcGUiOlsiZ3JwYzppbnZva2UiXSwiaXNzIjoiaHR0cDovL2xvY2FsaG9zdDo5MDAwIiwiZXhwIjoxNzg0MTcwODkzLCJpYXQiOjE3ODQxNzA1OTMsImp0aSI6IjY4NzBjODA4LTdkOWQtNDBjMS1iZWVjLTNmNGE1YmEzZmNjNCJ9.FPE3D9AECEtheykXTjWVPhW-BH5kMoCTlMyjvwPsSG0NhkGwK18YQIYG2x4mMJ0mXLlAaZybj9Wv2L35zFnYG8UesXt2Lrt033lduWgO7U8PyU7wfh53_6aCCxlpvISE95NzgchxJ0SXRQbhK1AHV-Hq_TbVFBlmWKAgFOFLHwOnAQ4lpiXSdPBwc-c0u49O87Oo-ax2Iygo9bZ5veIpNrD9rrQhiv75PX3UBxO3puB0nx7qgw0itJBgX_2SjJ-uzBfEK767J1OWGf6FZeISmbweqPihjp1uOSJkRk9wcIBukk_BeqkWRdxhBuqnya1FRC26kfdyIHwAJTODIz_-QA, grpc-accept-encoding: gzip] padding=0 endStream=false
Bearer 以降はJWTトークンですが、JwtトークンのデコーダでみるとOauthServerが発行したトークンであることを確認できます。
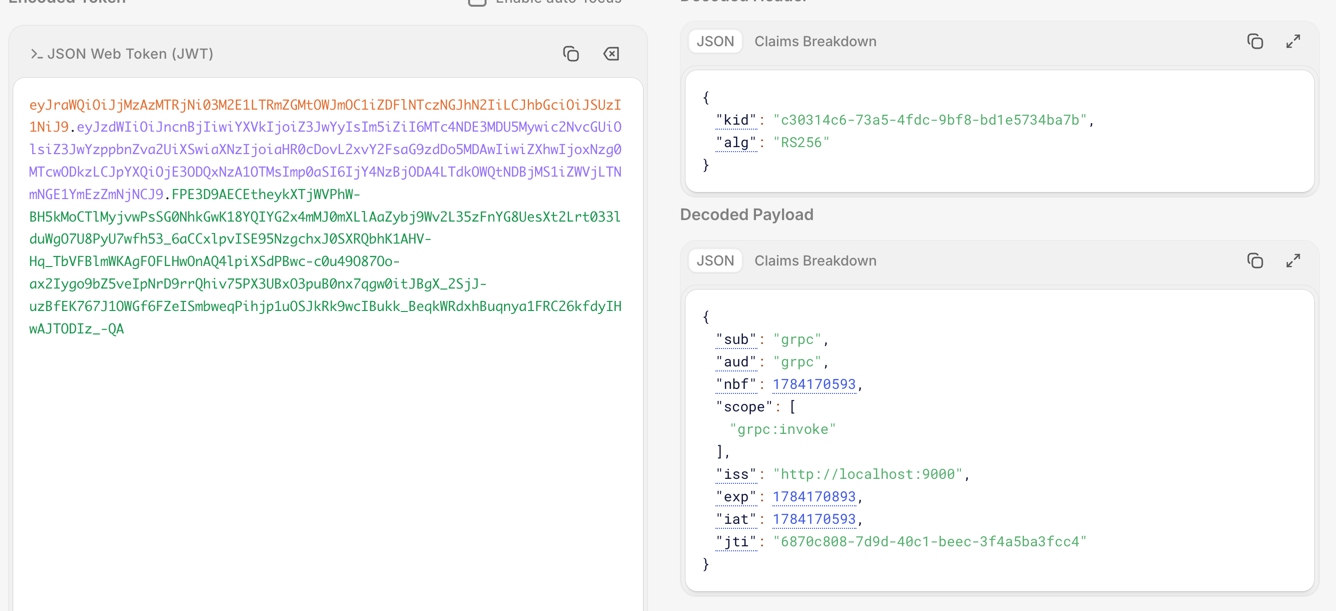
あとはたとえば、spring.security.oauth2.client.registration.grpc-client.client-secret=grpc を意図的にちがうものをいれると以下のように認証エラーになることも確認できます。
2026-07-16T12:26:47.593+09:00 ERROR 79948 --- [client] [nio-8081-exec-1] o.a.c.c.C.[.[.[/].[dispatcherServlet] : Servlet.service() for servlet [dispatcherServlet] in context with path [] threw exception [Request processing failed: org.springframework.security.oauth2.core.OAuth2AuthorizationException: [invalid_token_response] An error occurred while attempting to retrieve the OAuth 2.0 Access Token Response: 401 Unauthorized on POST request for "http://localhost:9000/oauth2/token": "{"error":"invalid_client"}"] with root cause
さて、このように、gRPCの認証機能を実装できました。 この段階でもかなりシンプルに実装できた点はいい感じと思います。
ただし、この例だとspring.security.oauth2.client.registration.grpc-client.client-secret が実質パスワード扱いであり、
この情報がもれると、意図しないサーバーから gRPC を実行できてしまいます。
これ自体は色々な手段でもう一段セキュアにすることもできるのですが、そもそも完全なパスワードレスにすることも可能です。
これは次エントリで取り上げます。
おわりに
Spring gRPC と Spring Authorization Server を合体させれば、gRPCの認証は楽チンでした。