Trying Tanzu Platform Self Managed — For Admins: Automatic DNS Registration
· 20 min read
Let's try the on-prem edition of the latest product, Tanzu Platform.
This post covers DNS registration for deployed apps.
Series
- Installation
- For admins: Project setup
- For users: Deploying to a Space
- For admins: Slimming down the deploy target
- For admins: Enabling HTTPS
- Here> For admins: Automatic DNS registration
Bonus: The "Things You Don't Need to Know about Tanzu Platform" series
Automatic DNS registration for applications
As introduced in this article and this article, we kept adding host headers and SNI headers to curl by hand. In real environments, however, most cases call for proper DNS registration.
At the time of writing, automatic DNS registration from TP is supported only with NSX ALB (aka AVI). Writing "only NSX ALB (aka AVI) is supported" may make users who don't run AVI imagine a grand setup is required, but all we use is AVI's DNS feature. AVI doesn't need to live on the same infrastructure either — it can be deployed in a public or different cloud. In other words, AVI can be installed with a much looser coupling than you might think.
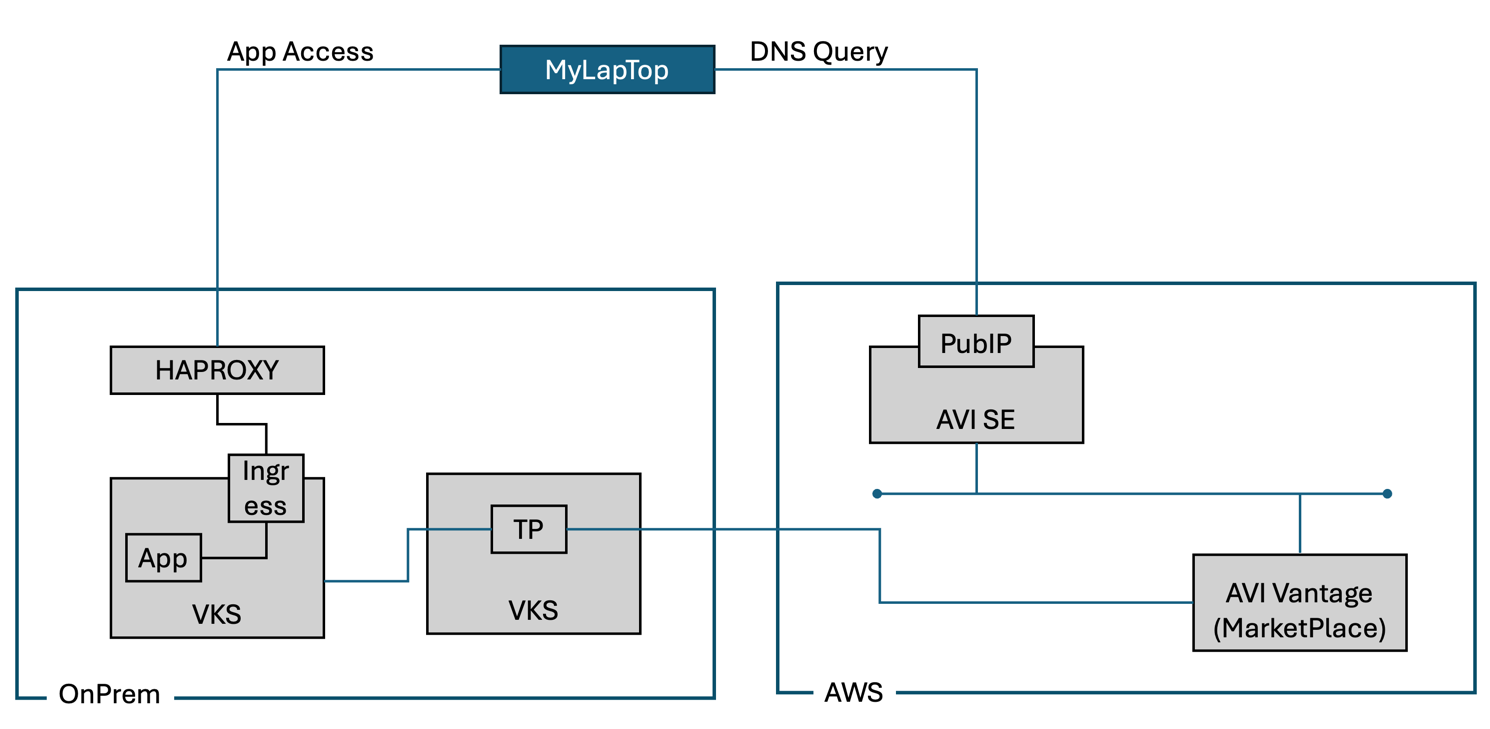
In my environment TP is deployed on-prem on vSphere (no AVI; using HAproxy), and we'll do automatic DNS registration with an AVI running in AWS. Pictured, it looks like this:
Deploying AVI on EC2
Deploy AVI on EC2 following the guide below. An AWS Marketplace listing exists, so the steps up to here are easy.
After installation you need to set a password; run this in the CLI. After a short wait, you can reach the admin port over HTTPS.
admin@10-0-11-45:~$ sudo /opt/avi/scripts/initialize_admin_user.py
Please enter new password for user 'admin' :
Please re-enter the password  :
Resetting password for user admin.
WARNING: proto: file "metrics.proto" is already registered
See https://protobuf.dev/reference/go/faq#namespace-conflict

2025/01/17 01:46:29.694 [D]  init global config instance failed. If you donot use this, just ignore it.  open conf/app.conf: no such file or directory
Password reset complete
admin@10-0-11-45:~$
Once HTTPS access works, complete the initial setup.
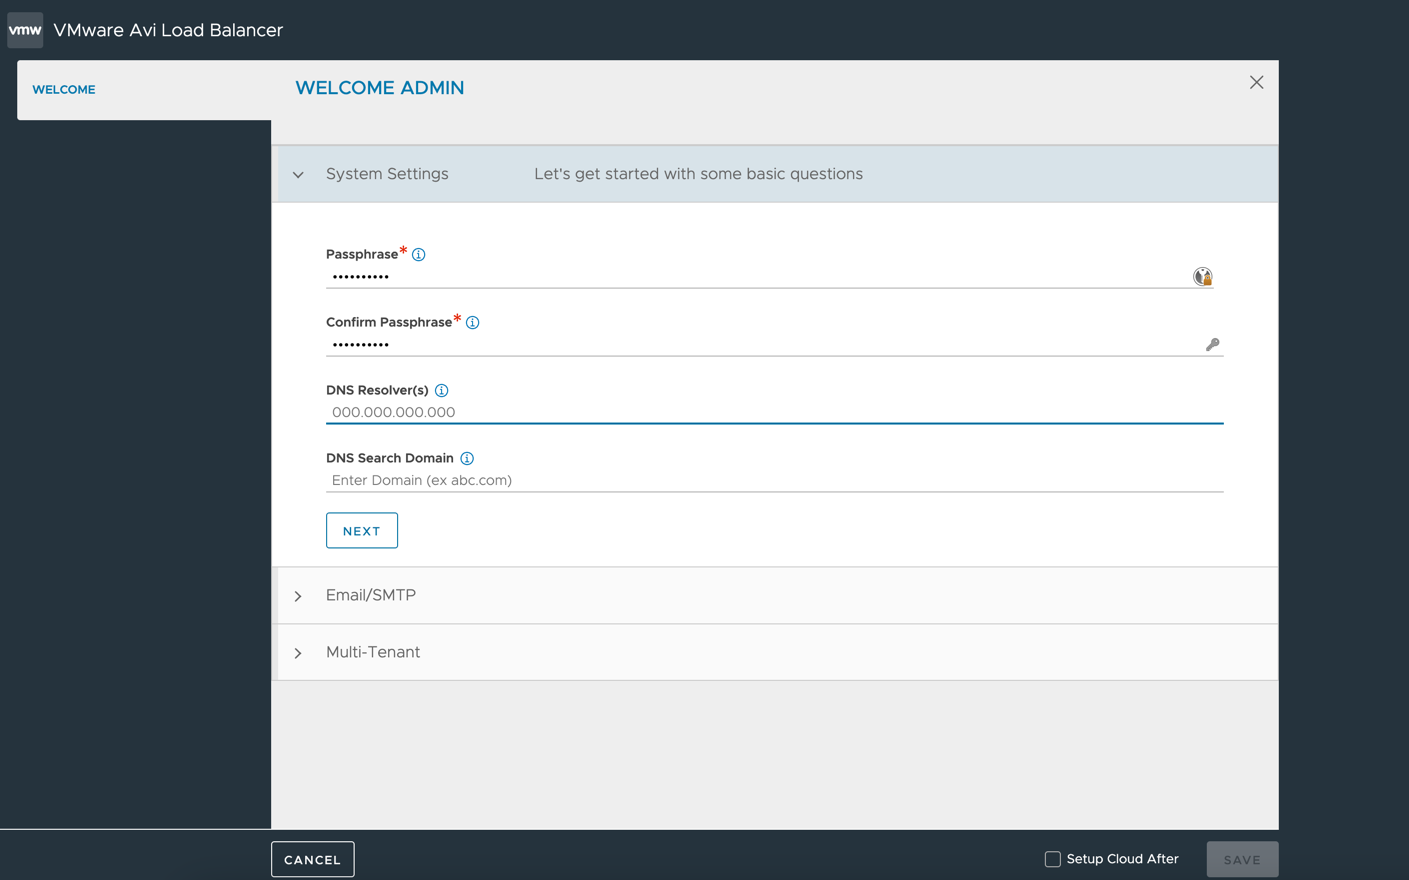
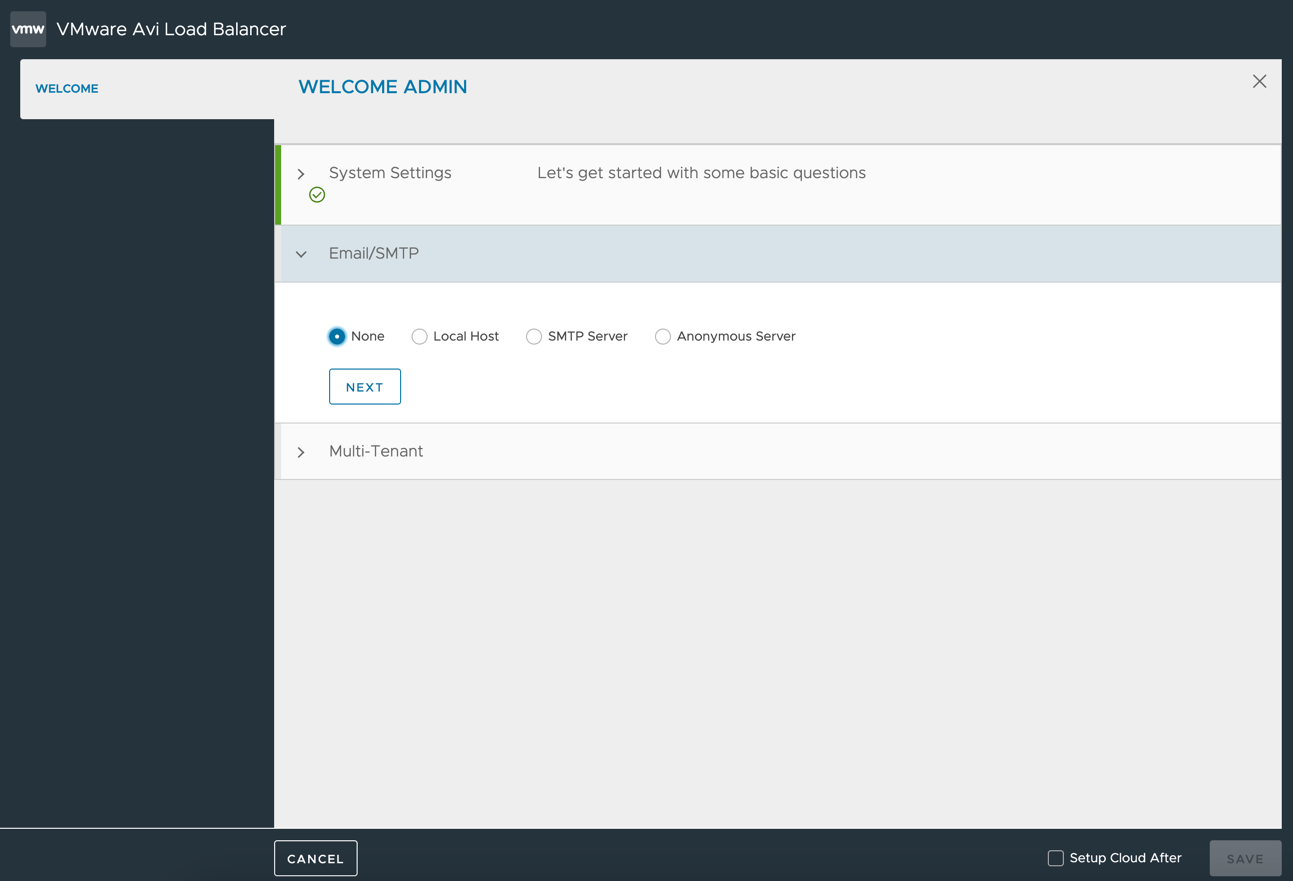
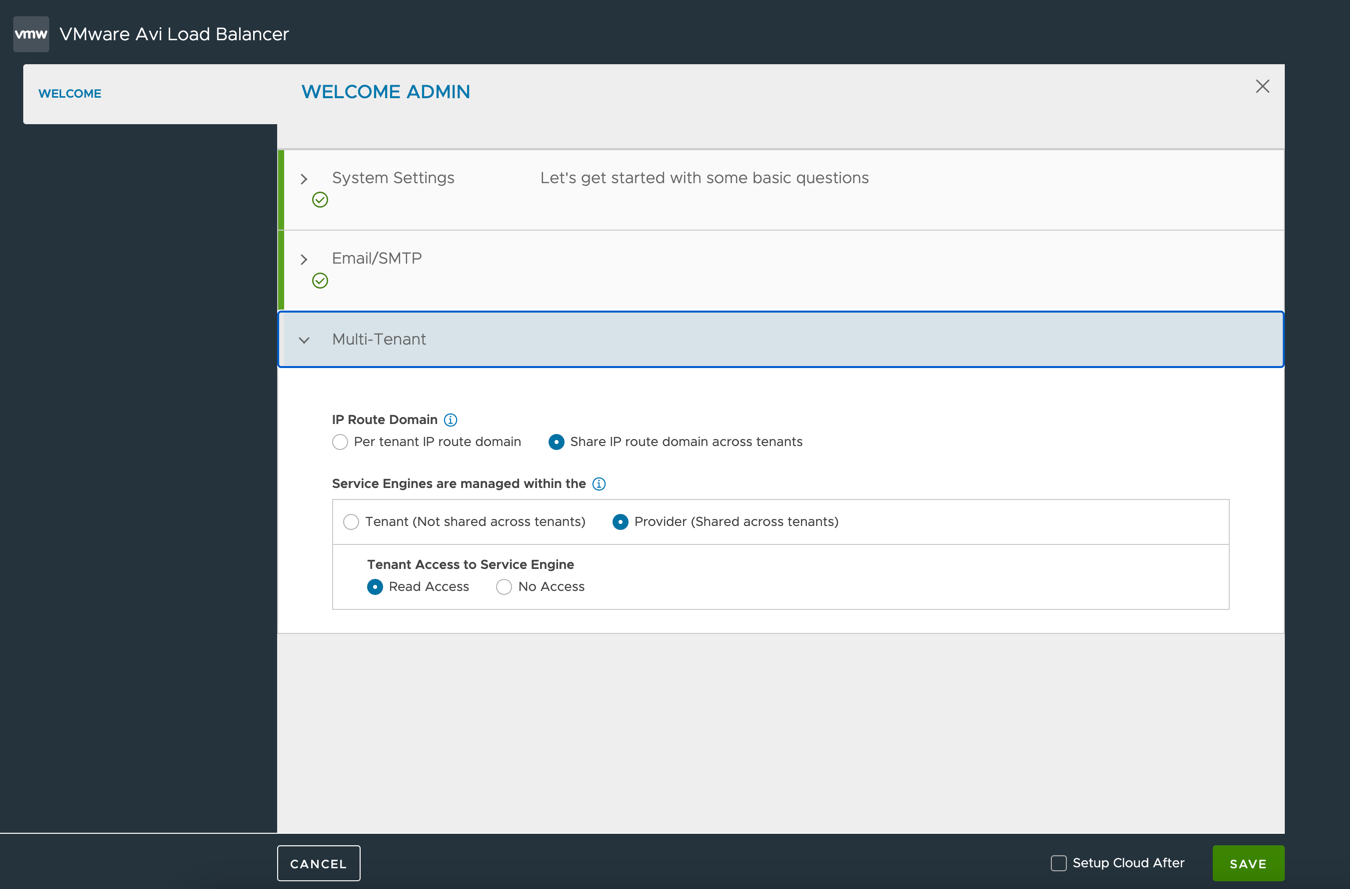
When done, you should be able to enter the AVI management console.
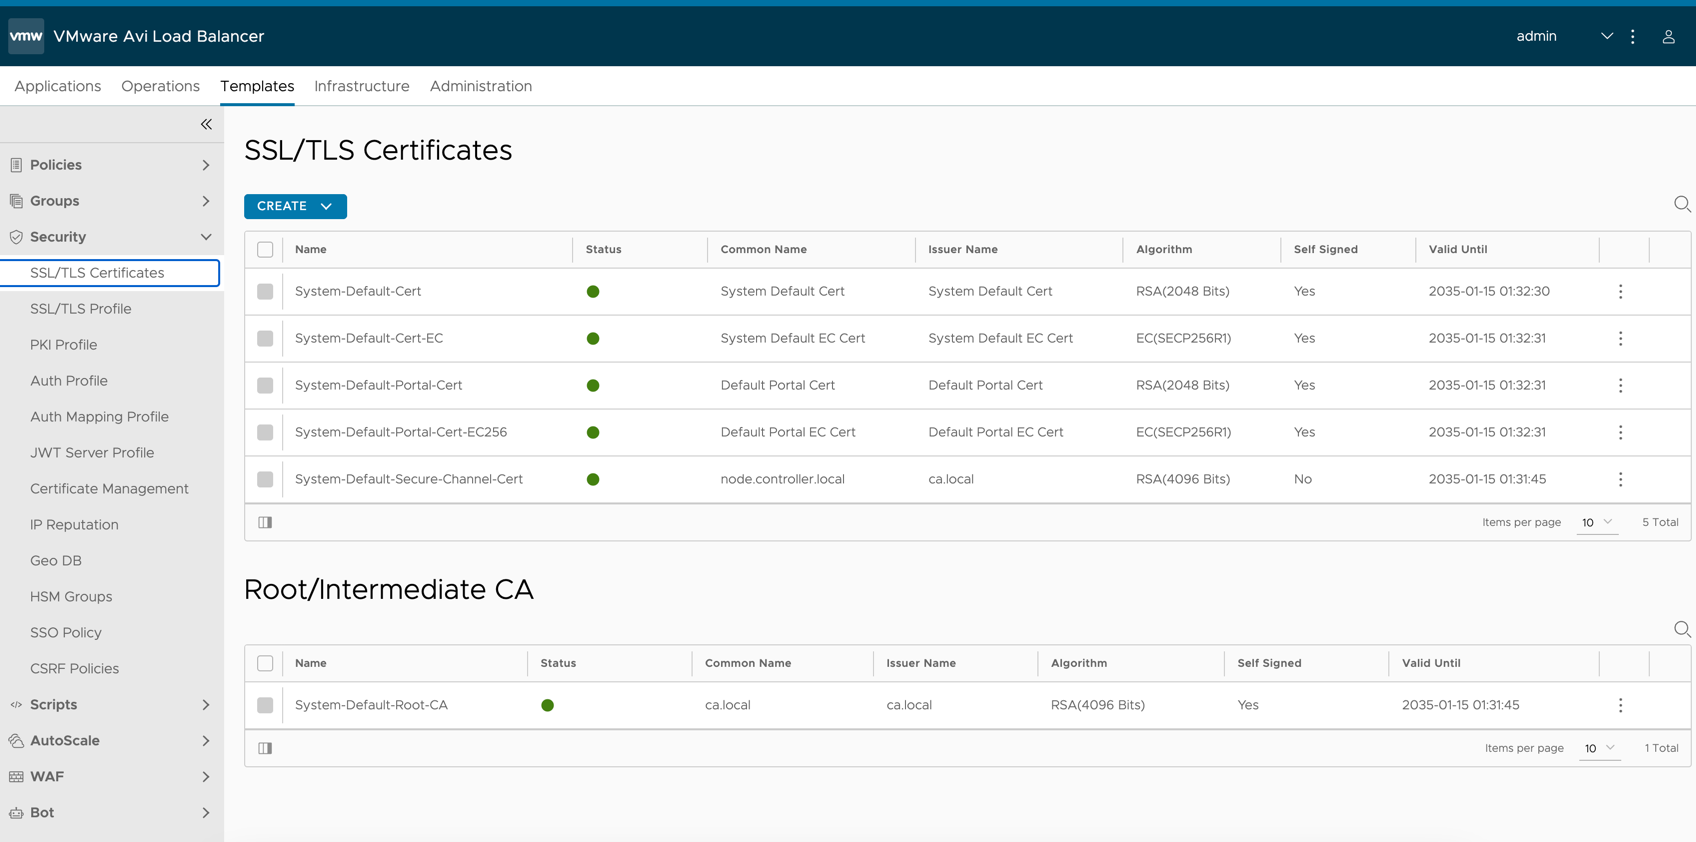
For TP to access AVI's API, the TLS certificate needs fixing, so let's do that.
Select Create under [Templates] > [Security] > [SSL/TLS Certificate].
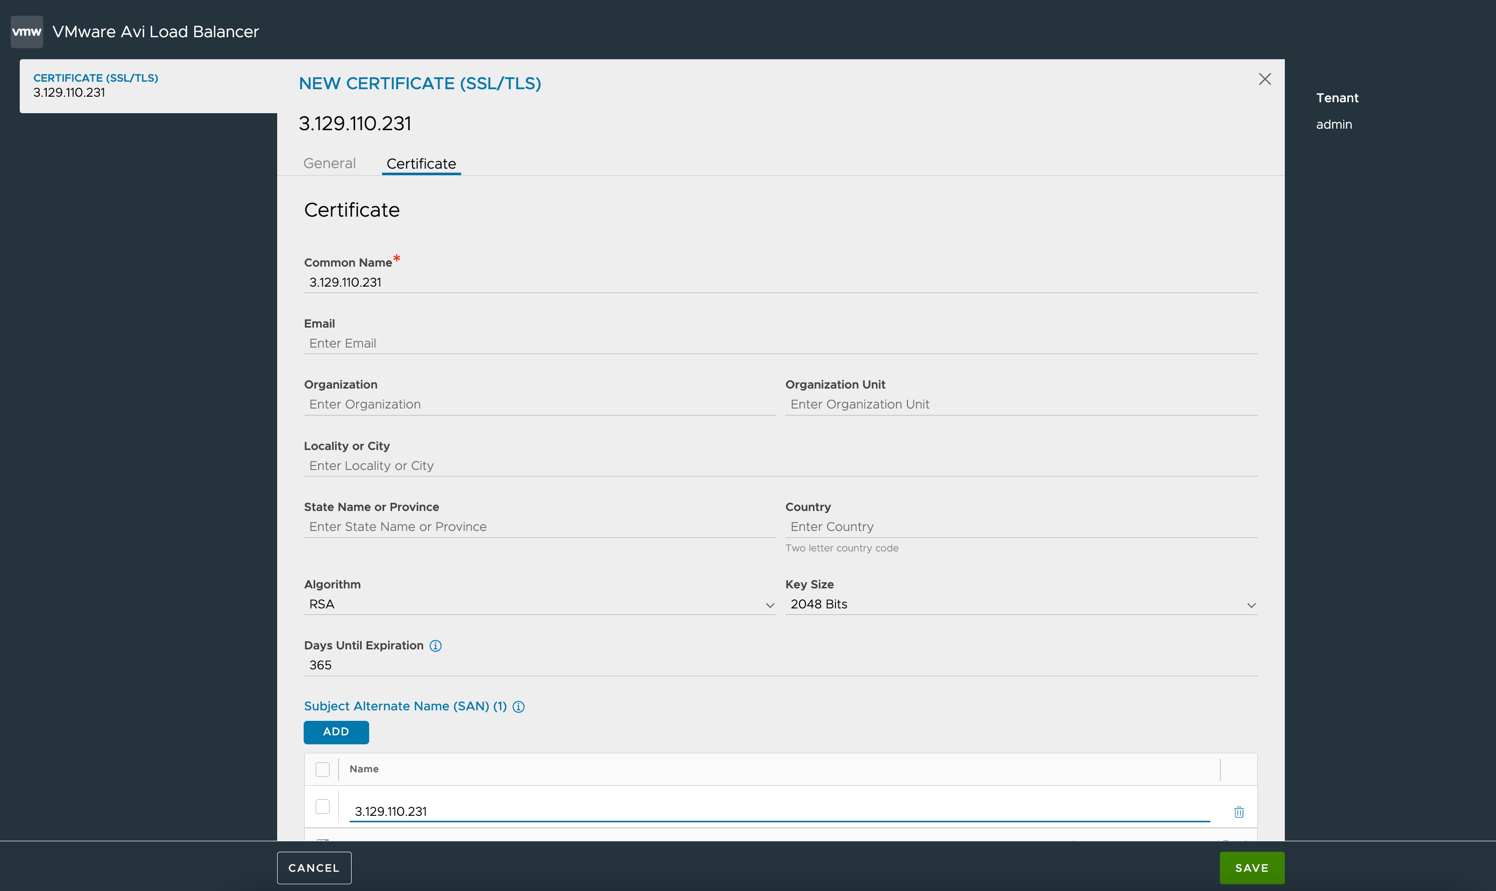
The point is to set CommonName and Subject Alternate Name to the IP address you use to access it in the browser.
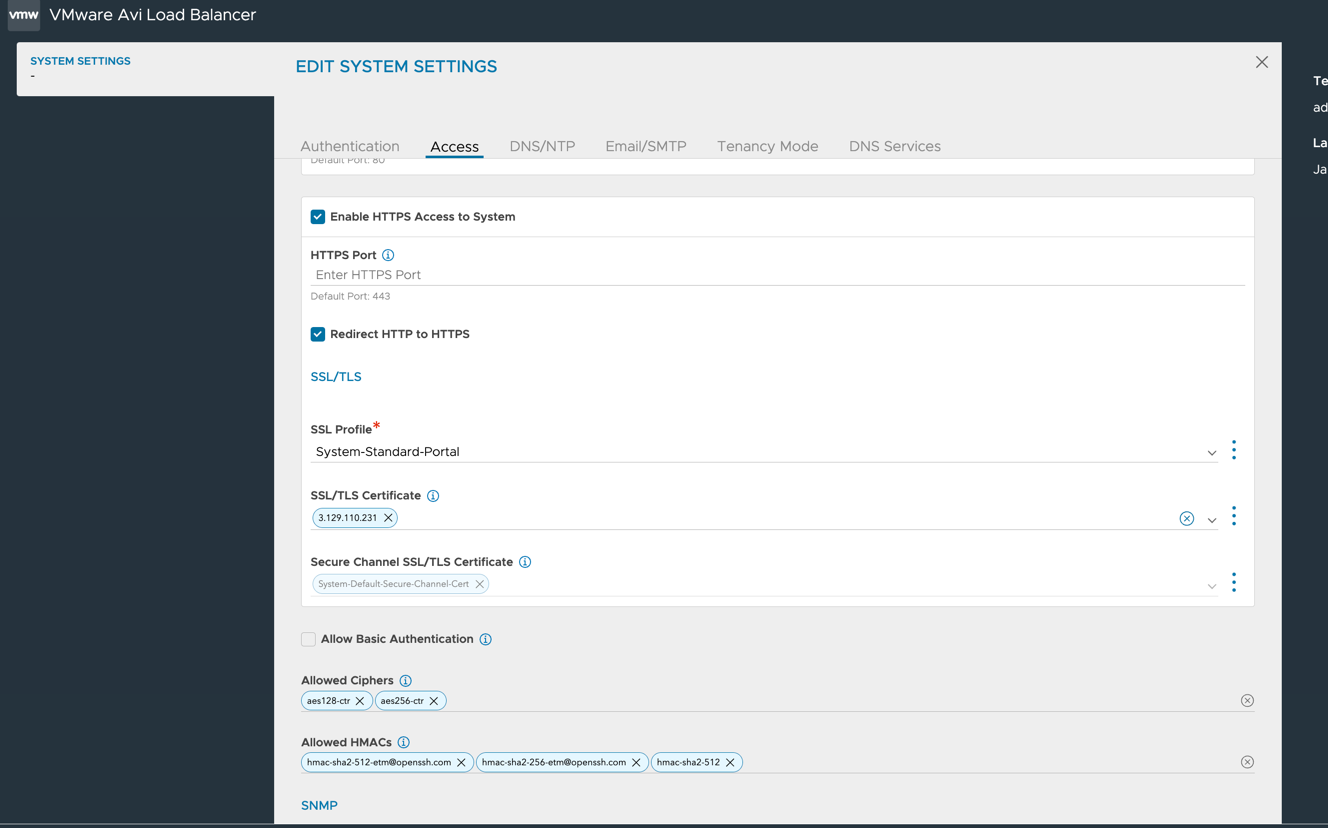
Then select [Administration] > [System Settings] and [Edit]. Delete all the already-configured SSL/TLS Certificates and register the new one.
Afterwards, re-logging into the browser gives a certificate error, so resolve it once more.
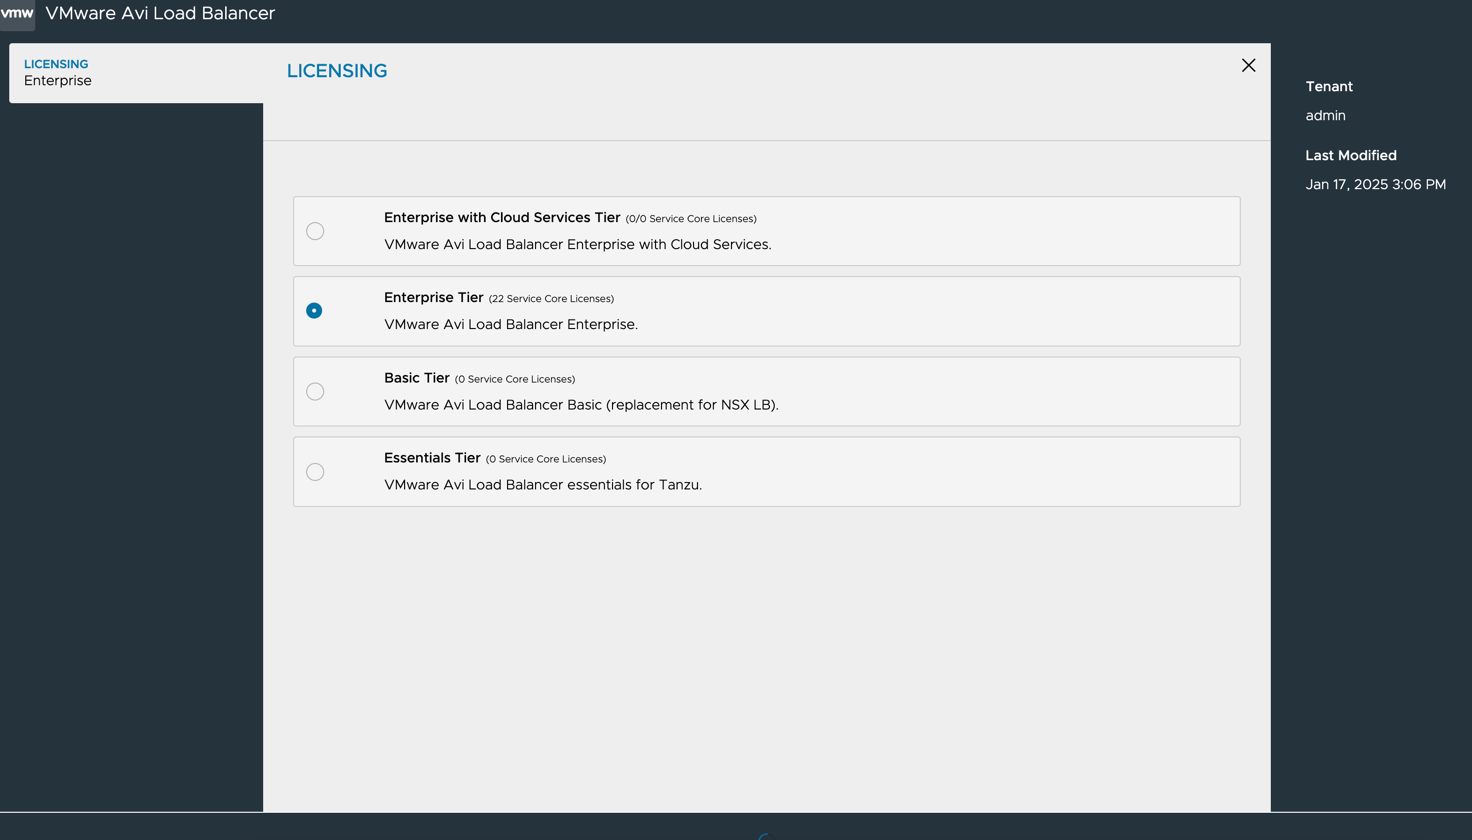
The final piece of setup: some license registration is required at [Administration] > [Licensing] on the AVI Controller. Entering Enterprise Tier gives you a 30-day Evaluation. Beyond that, take care not to violate licensing.
Creating the AVI IAM Role
For the AVI Controller to work with various AWS objects it needs IAM permissions. For security, using an IAM Role is recommended. Let's set this up before AVI's detailed setup.
The complete set of IAM rules for AWS integration is on Github; download it:
git clone https://github.com/avinetworks/devops.git
cd devops/tools/aws/iam-policies
Export your AWS account ID:
export ACCOUNT_ID=<AWS ACCOUNT ID>
I wanted to install via CLI following the manual, but at the time of writing it is quite wrong; in the end these commands were needed:
aws iam create-role --role-name vmimport --assume-role-policy-document file://vmimport-role-trust.json
aws iam put-role-policy --role-name vmimport --policy-name vmimport --policy-document file://vmimport-role-policy.json
aws iam put-role-policy --role-name vmimport --policy-name AviController-vmimport-KMS-Policy --policy-document file://avicontroller-kms-vmimport.json
aws iam create-role --role-name AviController-Refined-Role --assume-role-policy-document file://avicontroller-role-trust.json
aws iam put-role-policy --role-name AviController-Refined-Role --policy-name iam-policy --policy-document file://avicontroller-iam-policy.json
aws iam create-policy --policy-name AviController-EC2-Policy --policy-document file://avicontroller-ec2-policy.json
aws iam create-policy --policy-name AviController-S3-Policy --policy-document file://avicontroller-s3-policy.json
aws iam create-policy --policy-name AviController-IAM-Policy --policy-document file://avicontroller-iam-policy.json
aws iam create-policy --policy-name AviController-R53-Policy --policy-document file://avicontroller-r53-policy.json
aws iam create-policy --policy-name AviController-ASG-Policy --policy-document file://avicontroller-asg-policy.json
aws iam create-policy --policy-name AviController-SQS-SNS-Policy --policy-document file://avicontroller-sqs-sns-policy.json
aws iam create-policy --policy-name AviController-KMS-Policy --policy-document file://avicontroller-kms-policy.json
aws iam attach-role-policy --role-name AviController-Refined-Role --policy-arn "arn:aws:iam::${ACCOUNT_ID}:policy/AviController-EC2-Policy"
aws iam attach-role-policy --role-name AviController-Refined-Role --policy-arn "arn:aws:iam::${ACCOUNT_ID}:policy/AviController-S3-Policy"
aws iam attach-role-policy --role-name AviController-Refined-Role --policy-arn "arn:aws:iam::${ACCOUNT_ID}:policy/AviController-R53-Policy"
aws iam attach-role-policy --role-name AviController-Refined-Role --policy-arn "arn:aws:iam::${ACCOUNT_ID}:policy/AviController-ASG-Policy"
aws iam attach-role-policy --role-name AviController-Refined-Role --policy-arn "arn:aws:iam::${ACCOUNT_ID}:policy/AviController-SQS-SNS-Policy"
aws iam attach-role-policy --role-name AviController-Refined-Role --policy-arn "arn:aws:iam::${ACCOUNT_ID}:policy/AviController-ASG-Policy"
aws iam attach-role-policy --role-name AviController-Refined-Role --policy-arn "arn:aws:iam::${ACCOUNT_ID}:policy/AviController-KMS-Policy"
aws iam create-instance-profile --instance-profile-name AviController-Refined-Role
aws iam add-role-to-instance-profile --instance-profile-name AviController-Refined-Role --role-name AviController-Refined-Rol
Also missing from the manual: the Instance Profile ultimately needs to be attached to AVI, so I ran the following.
Export these environment variables:
export REGION=<REGION>
export INSTANCE_ID=<AVI Controller EC2 Instance ID>
Associate the created instance profile with the AVI Controller:
aws ec2 associate-iam-instance-profile --iam-instance-profile Name=AviController-Refined-Role --instance-id ${INSTANCE_ID} --region ${REGION}
That's it for the IAM Role setup.
If later steps fail, in most cases it's because of a mistake in this IAM Role setup.
When that happens, /opt/avi/log/cc_agent_go_<cloudname>.log on the AVI controller usually contains the failure cause.
Setting up AVI
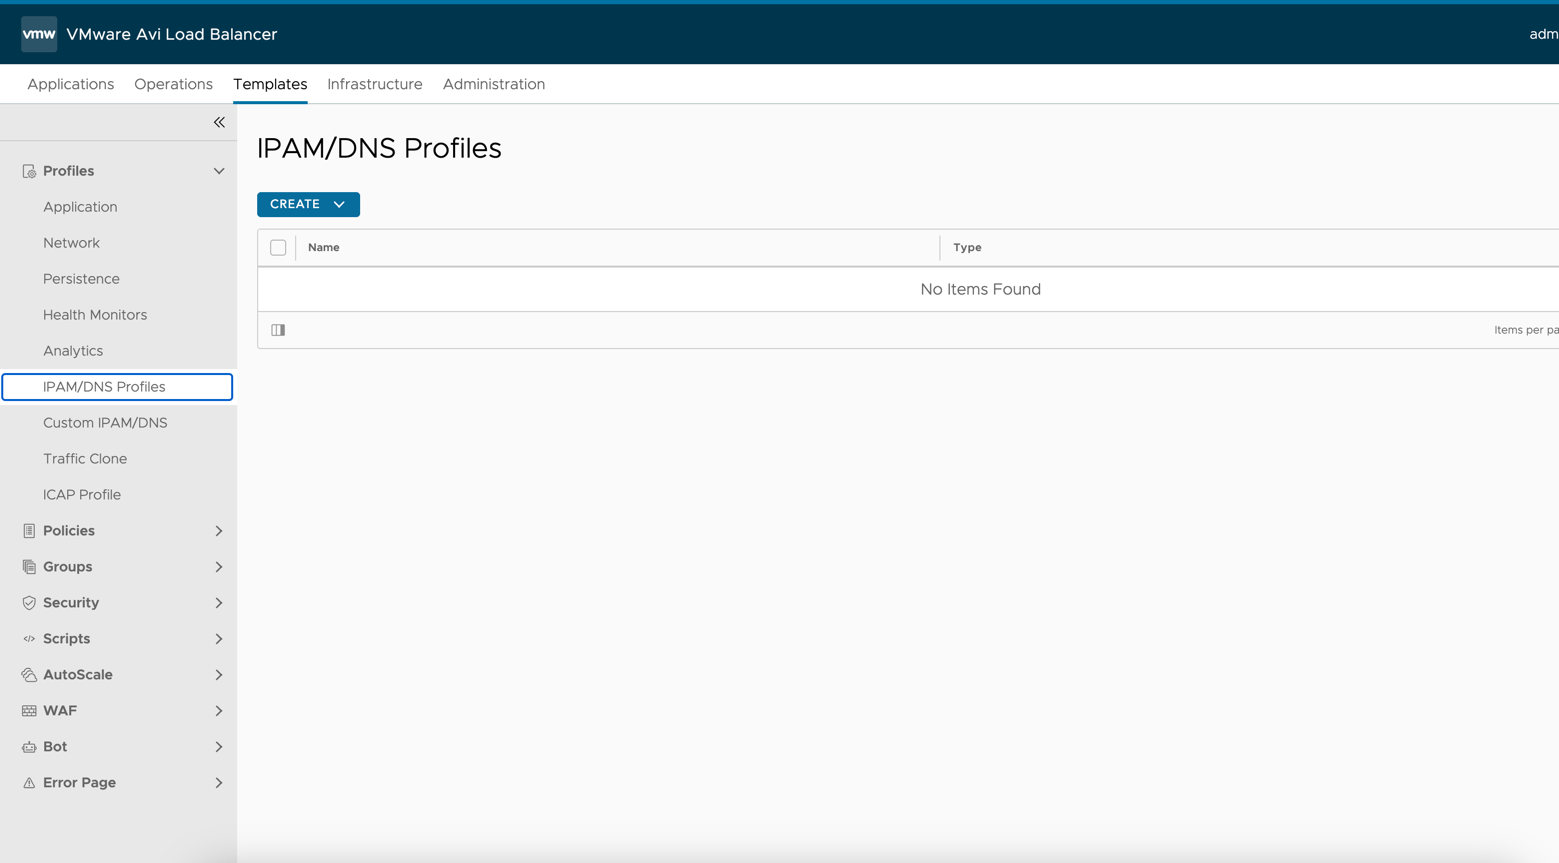
First, create a DNS Profile. Open the [Templates] tab and select [IPAM/DNS Profiles].
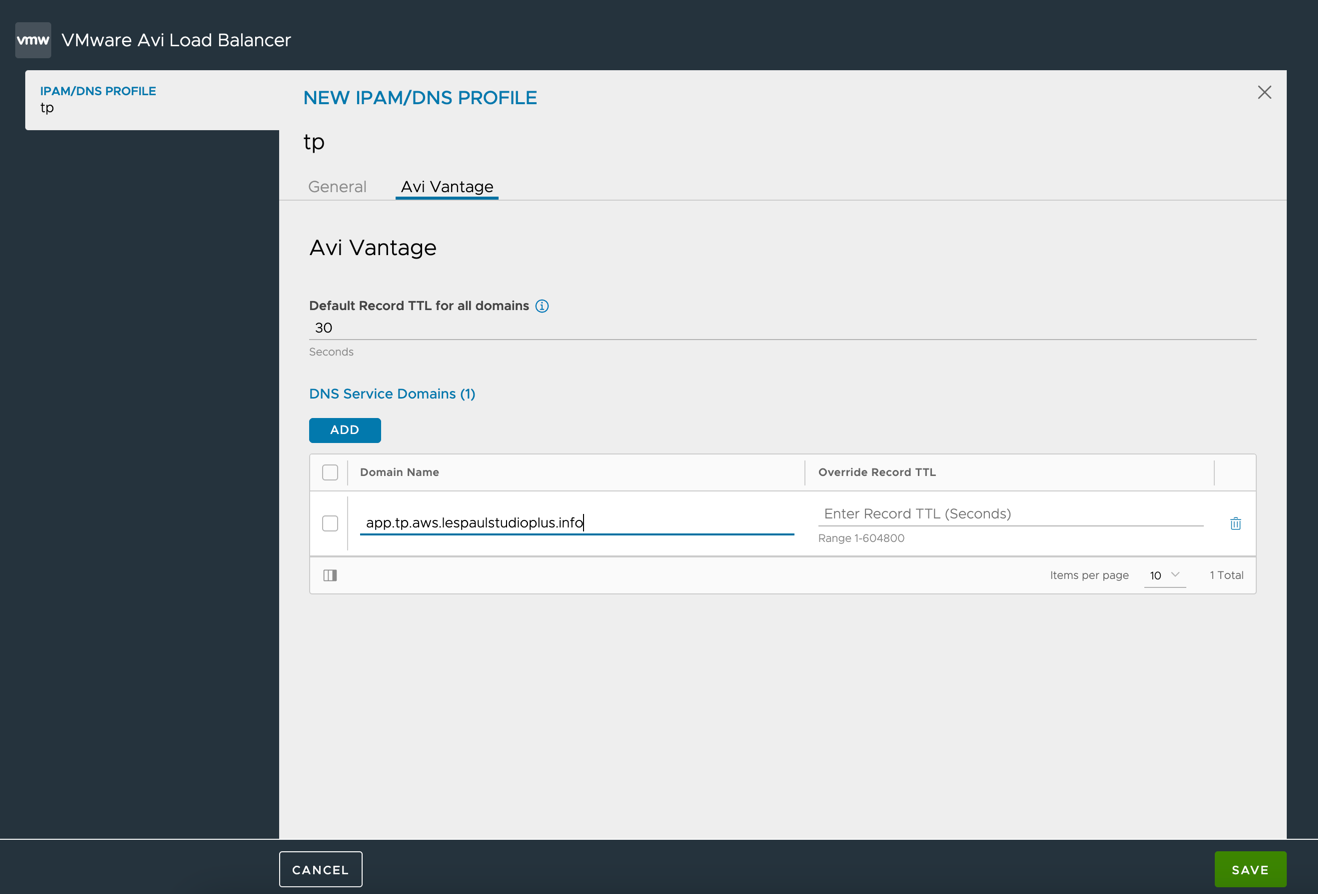
Set the domain TP apps will use in DNS Server Domains.
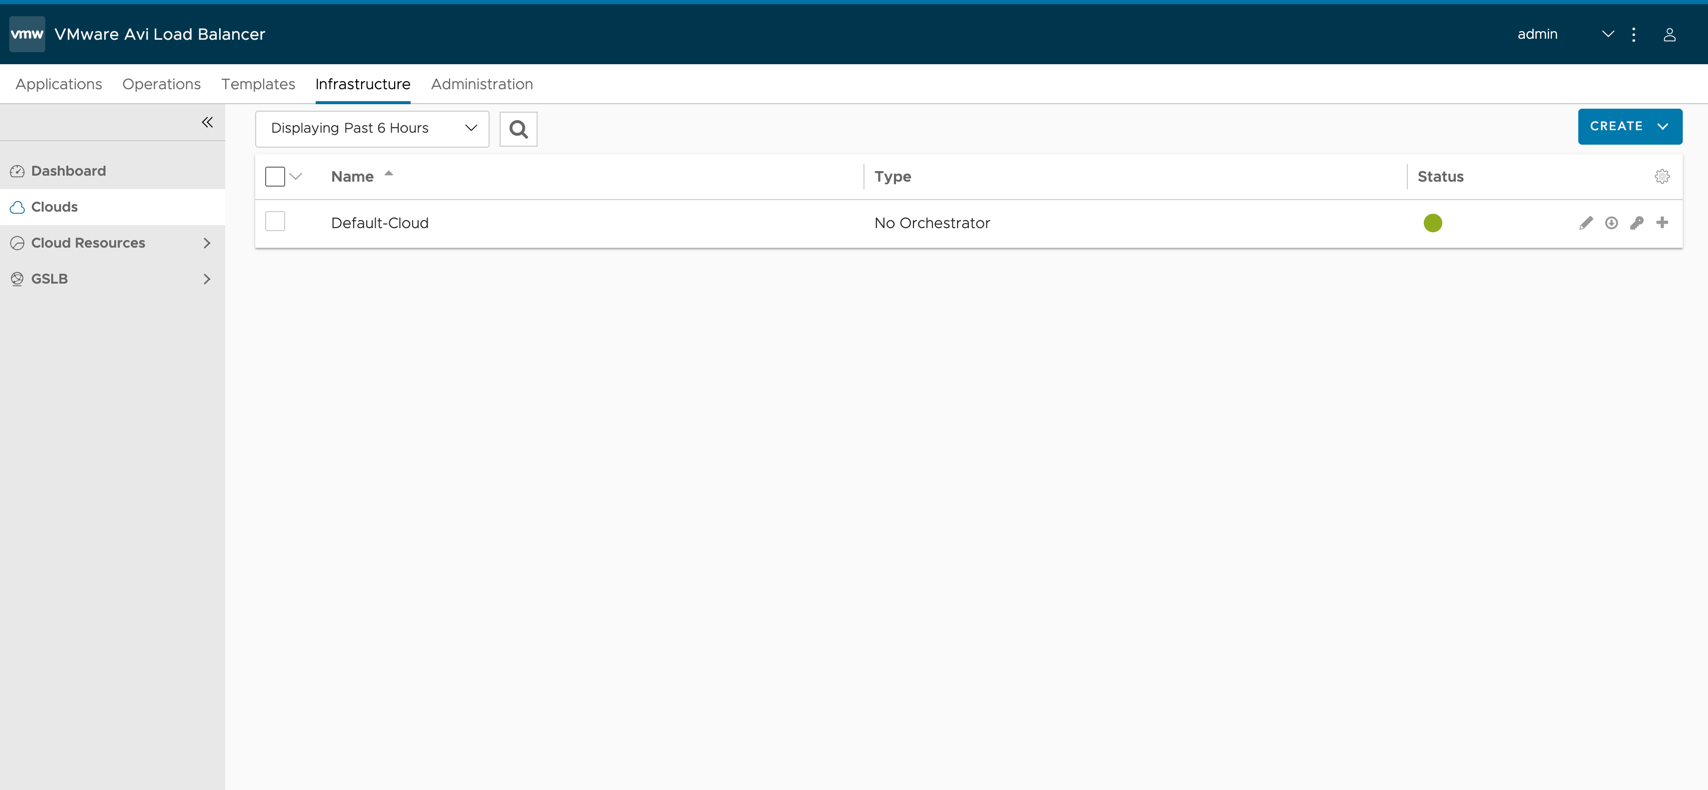
Next, configure the Cloud. Open the [Infrastructure] tab and select [Clouds]. Selecting [Create] asks you to choose a cloud; select [Amazon Web Services].
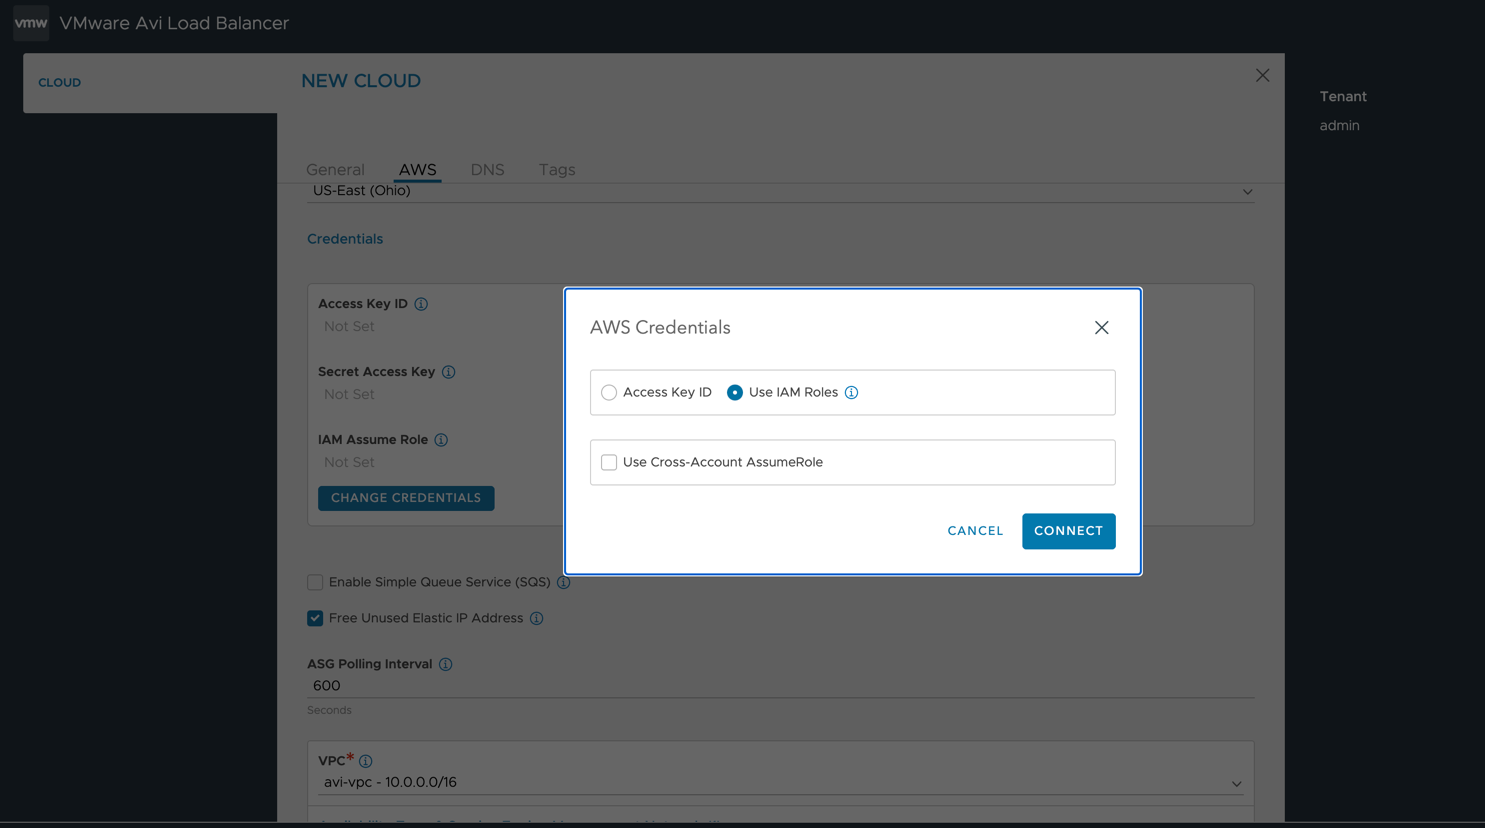
In the AWS section, after selecting the region, choose [Use IAM Roles] under [Set Credentials]. (If the setup is correct, this should proceed without errors.)
On the next screen, VPCs and the like should appear automatically in the pull-downs.
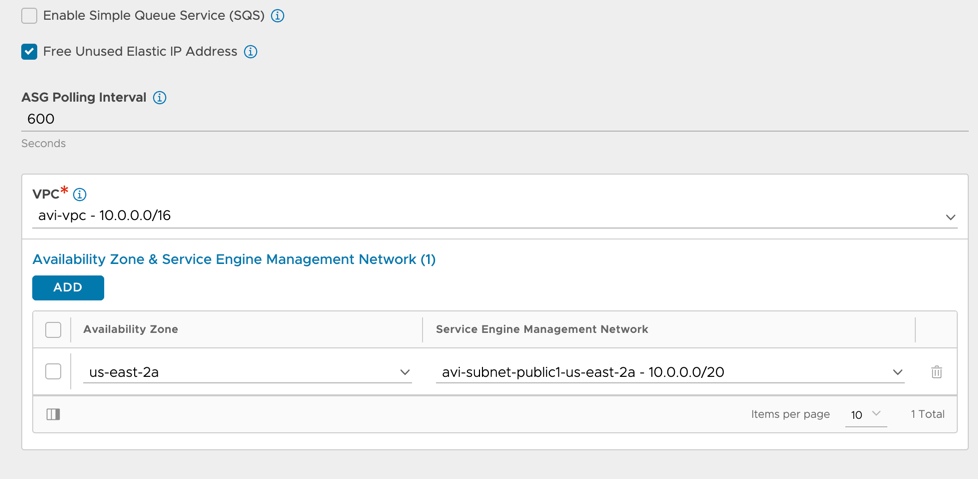
For the DNS Profile, select the one created in the earlier step.
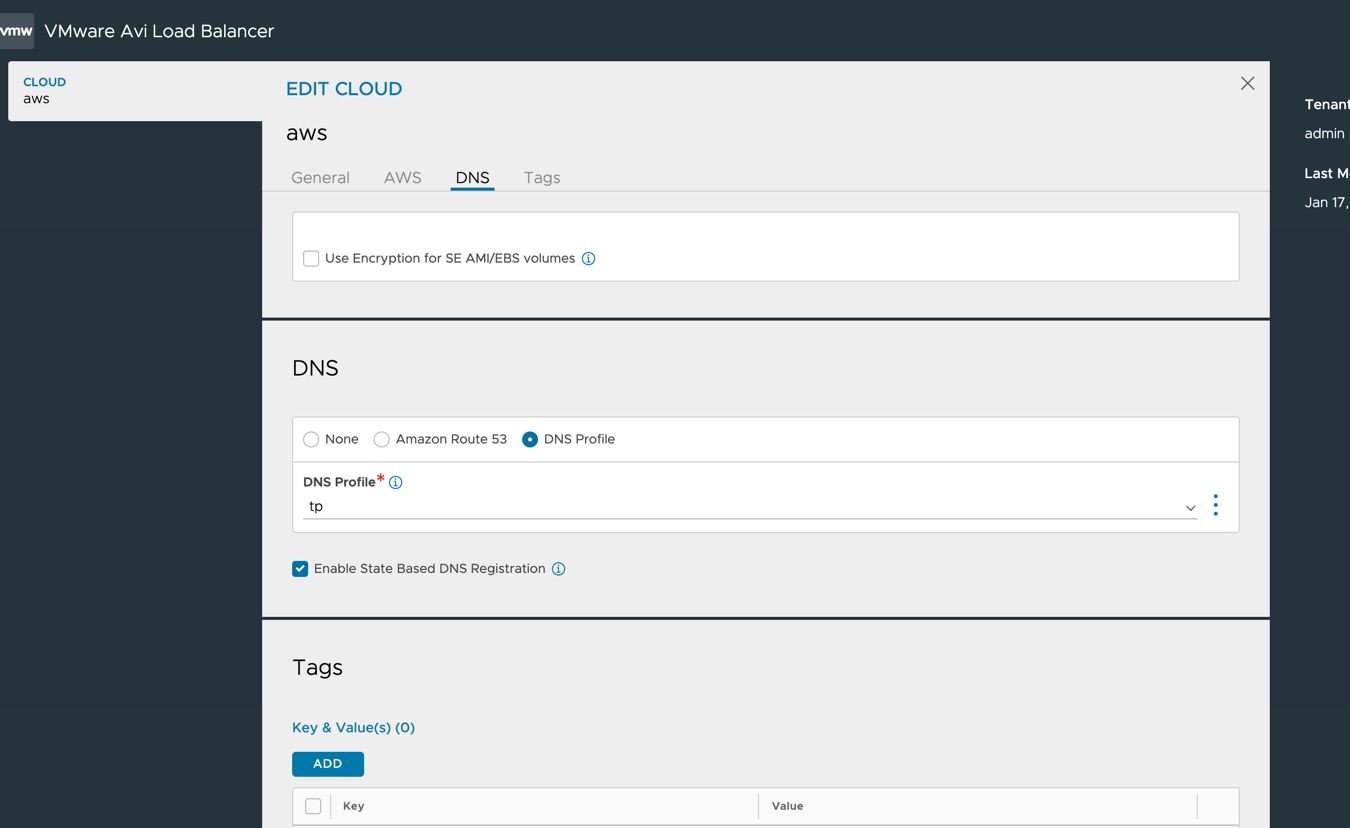
That completes the Cloud creation.
Creating the AVI DNS Service
Create a Virtual Service for the DNS Service. Select [Applications] > [Create Virtual Service]. Choose the cloud you created, and first set the Application Profile to System DNS.
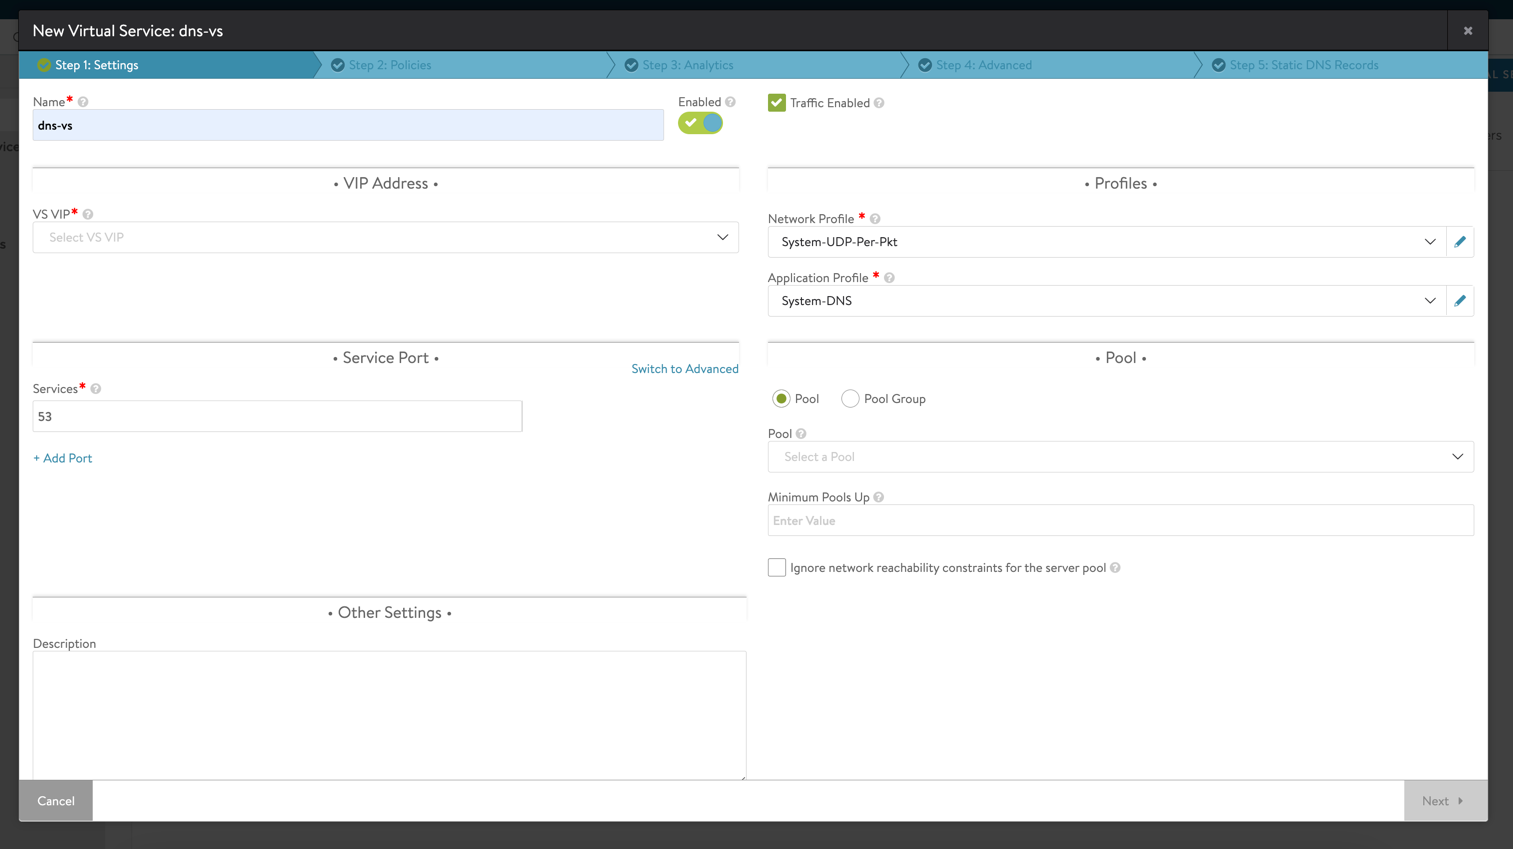
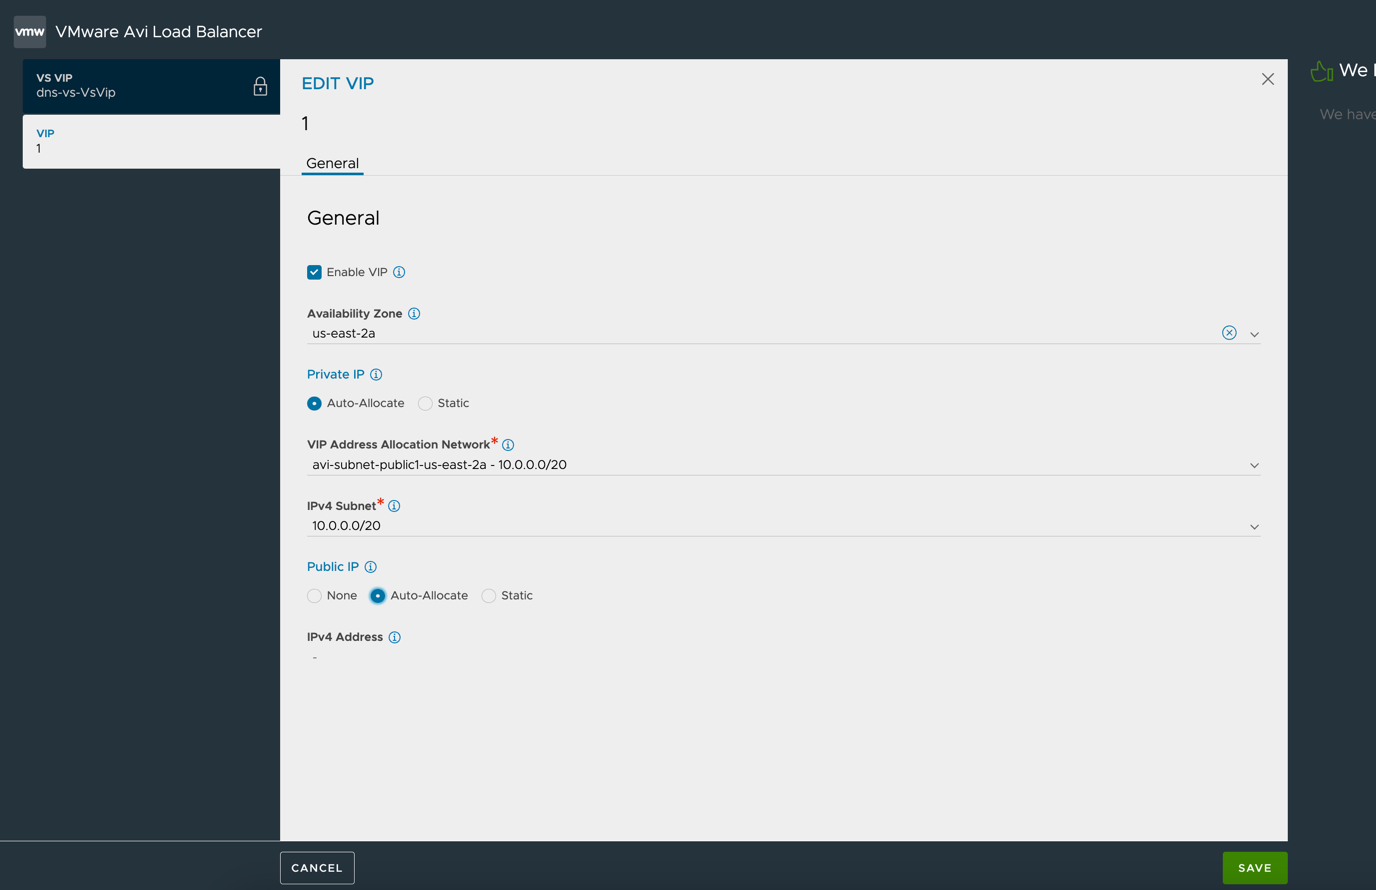
Then select VIP and [Create VIP]. Assuming TP needs to reach this VIP, allow public traffic too.
Next, the DNS record is optional but let's create it. Keep the defaults.
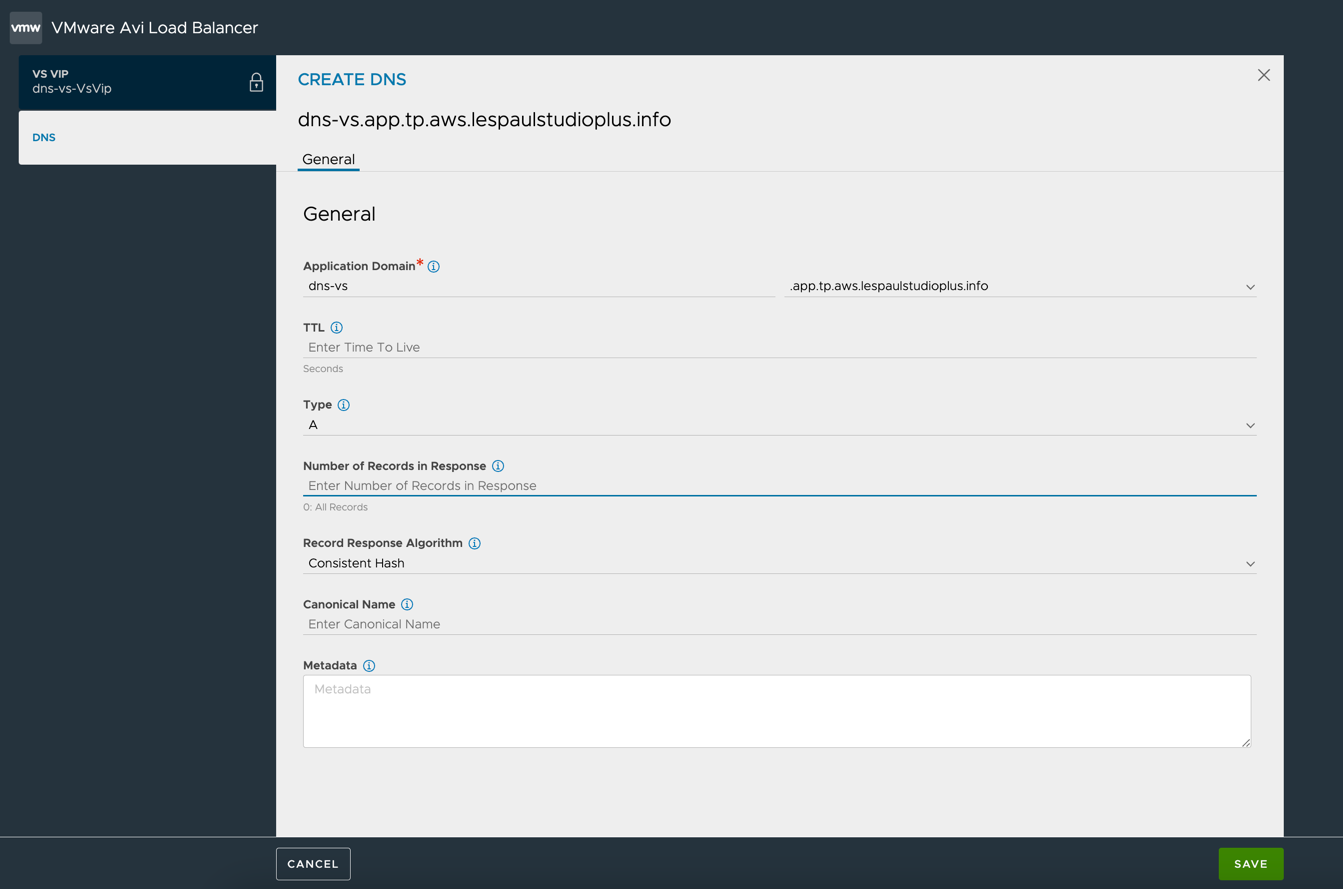
Then keep selecting Next. Create the Virtual Service with everything at defaults.
The first time you create a Virtual Service, an SE (EC2 instance) starts. Behind the scenes it creates an image in S3 > creates an AMI > deploys the SE, so wait about 5 minutes. If it doesn't work, suspect the IAM Role.
Once the Virtual Service is created, select [Administration] > [System Settings], then [Edit]. On the DNS Services tab, specify the Virtual Service you created.
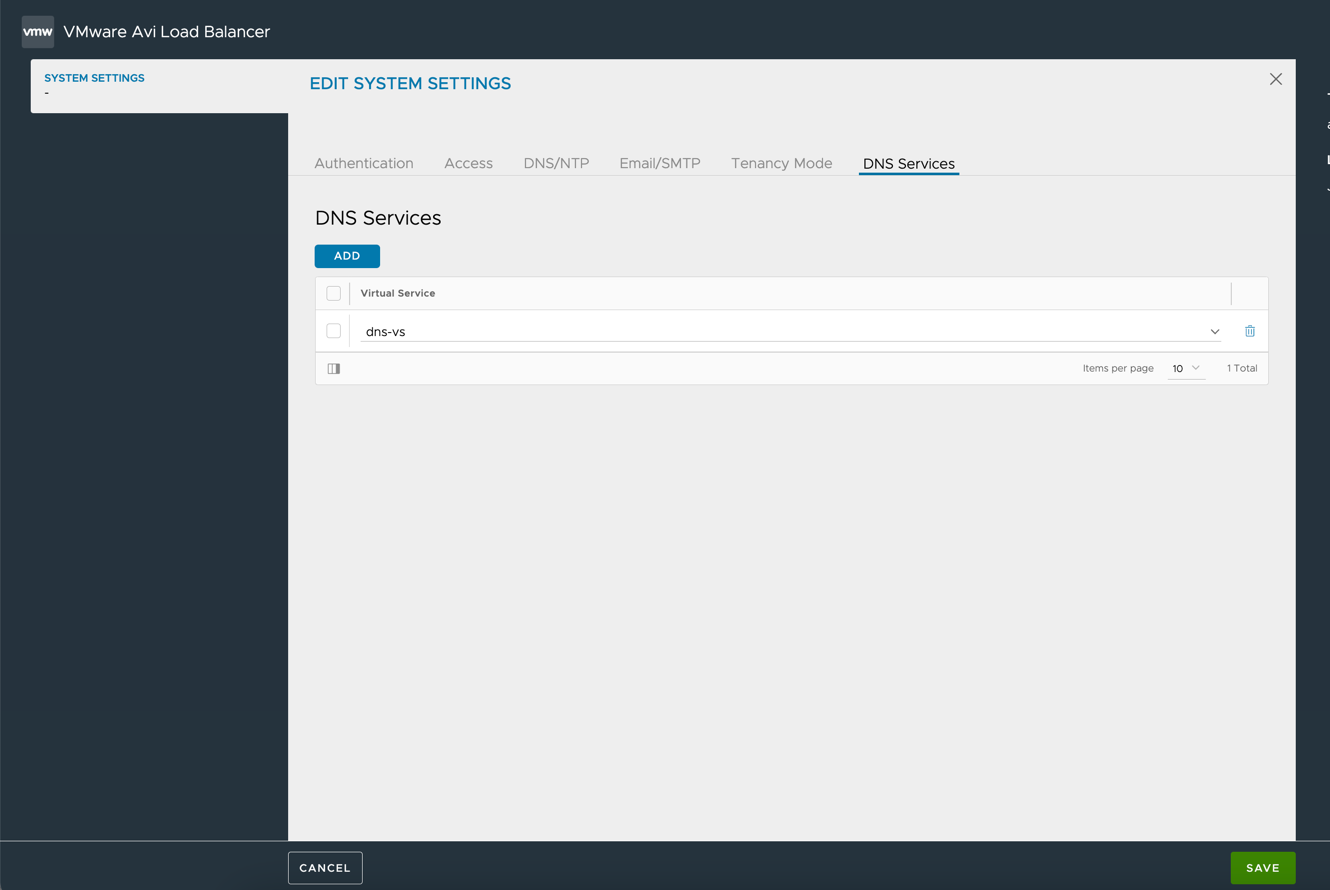
When done, confirm from your local machine that you get a response:
nslookup dns-vs.<domain> <AVI public IP>
You should get a response like this:

Configuring AVI GSLB
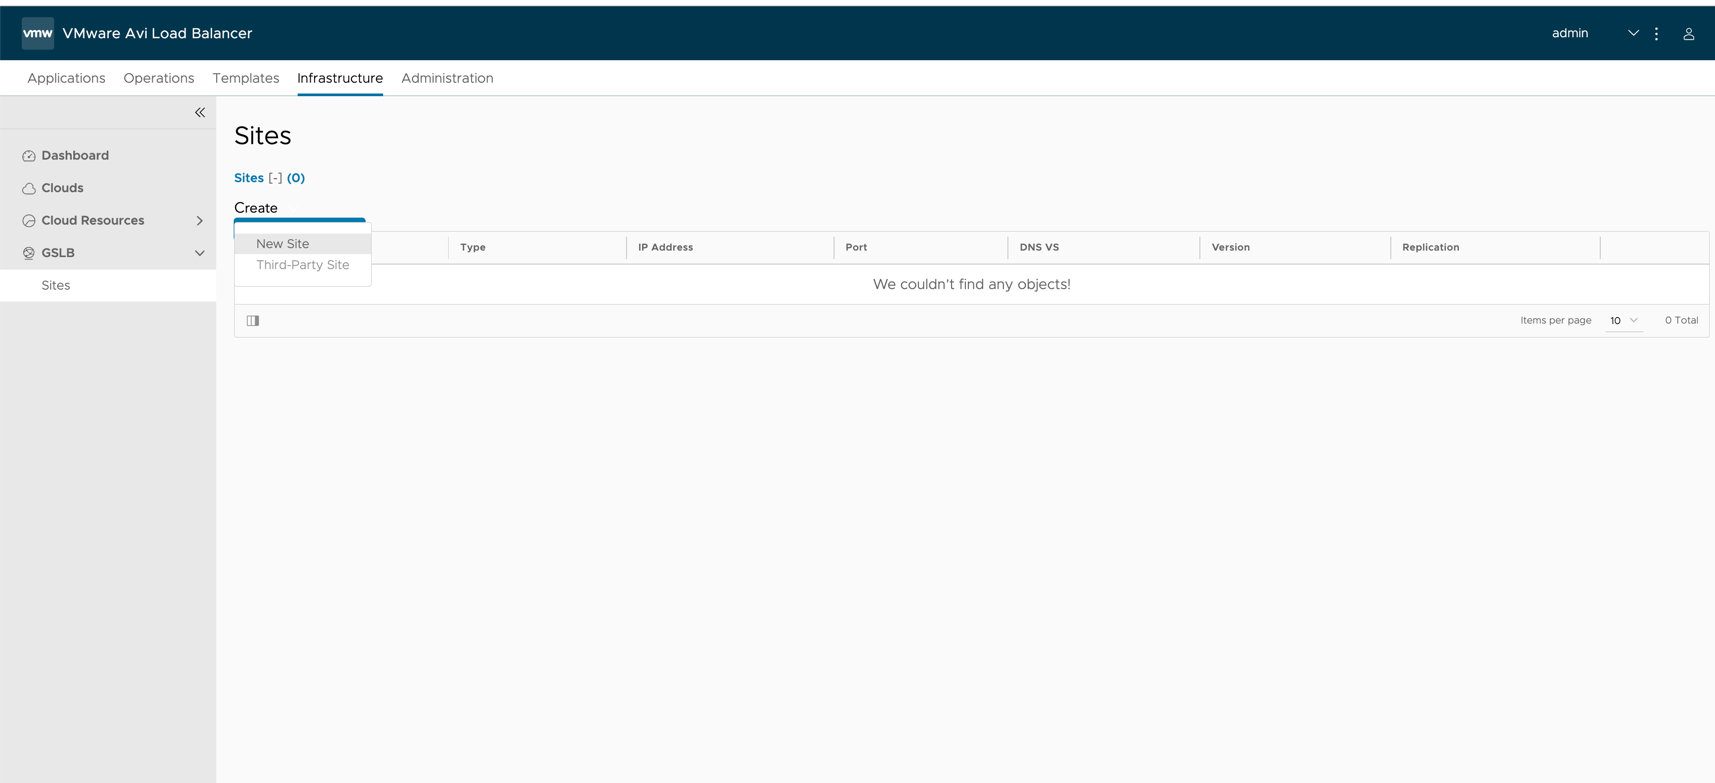
Wait, there's more?... Yes, just a little further. Finally, configure GSLB. Run Create from [Infrastructure] > [GSLB] > [Site], selecting [New Site].
First, enter the site name at the top.
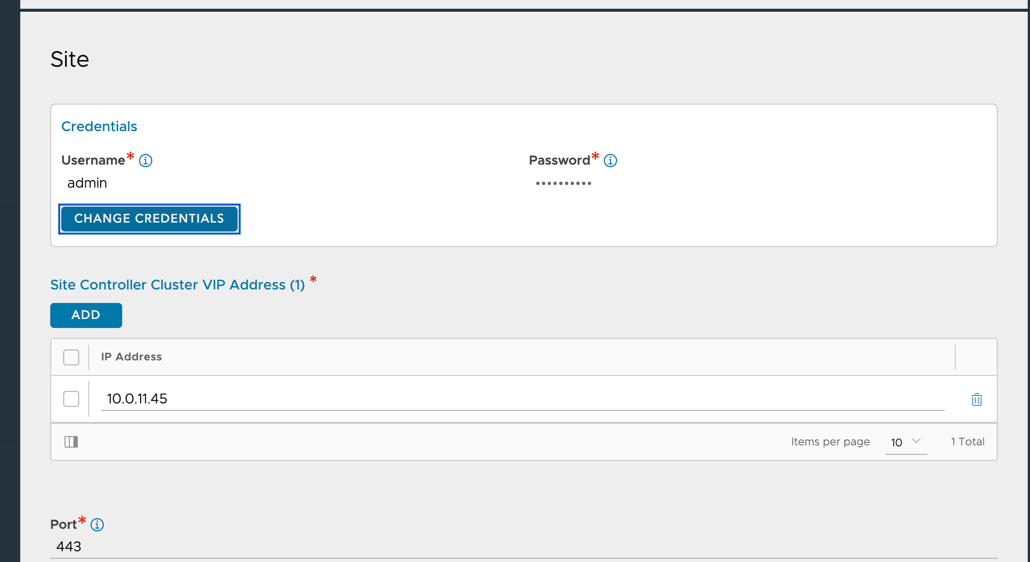
 Next, under Change Credentials enter the AVI Controller username and password.
 In SubDomains, enter the name-resolution info the apps will use.
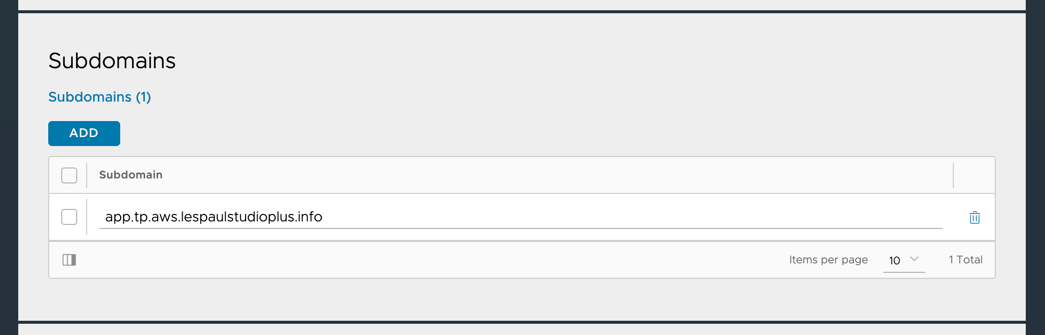 Finally, under Placements specify the DNS Virtual Service created earlier.
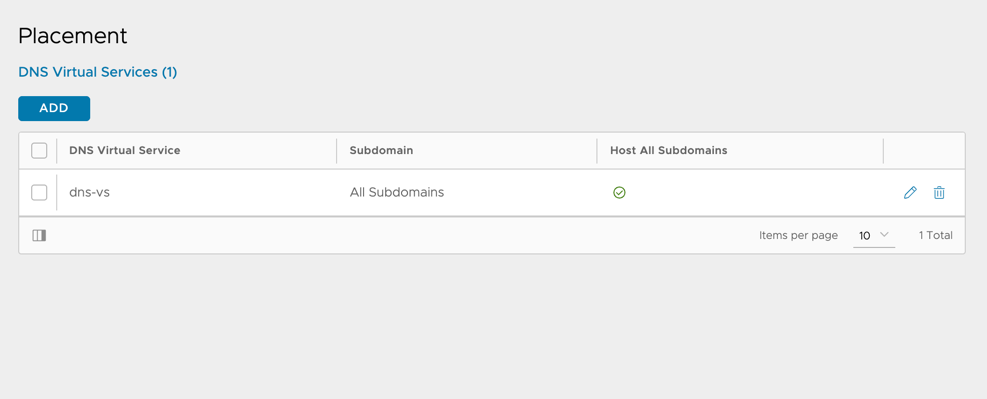
Well done — AVI setup is complete.
Setting up TP
Enter the configured AVI's information on the TP side. Run Create from [Setup & Configurations] > [Networking] > [DNS Providers].
Enter it as in the screenshots below:
- Name: anything
- Zone: the app domain
- Enter the AVI credentials
- For Custom root/CA Certificate, paste the exported TLS certificate newly created during the AVI Controller setup
In this configuration HealthCheck is critically important: if the AVI environment cannot reach TP's applications, Disable it.
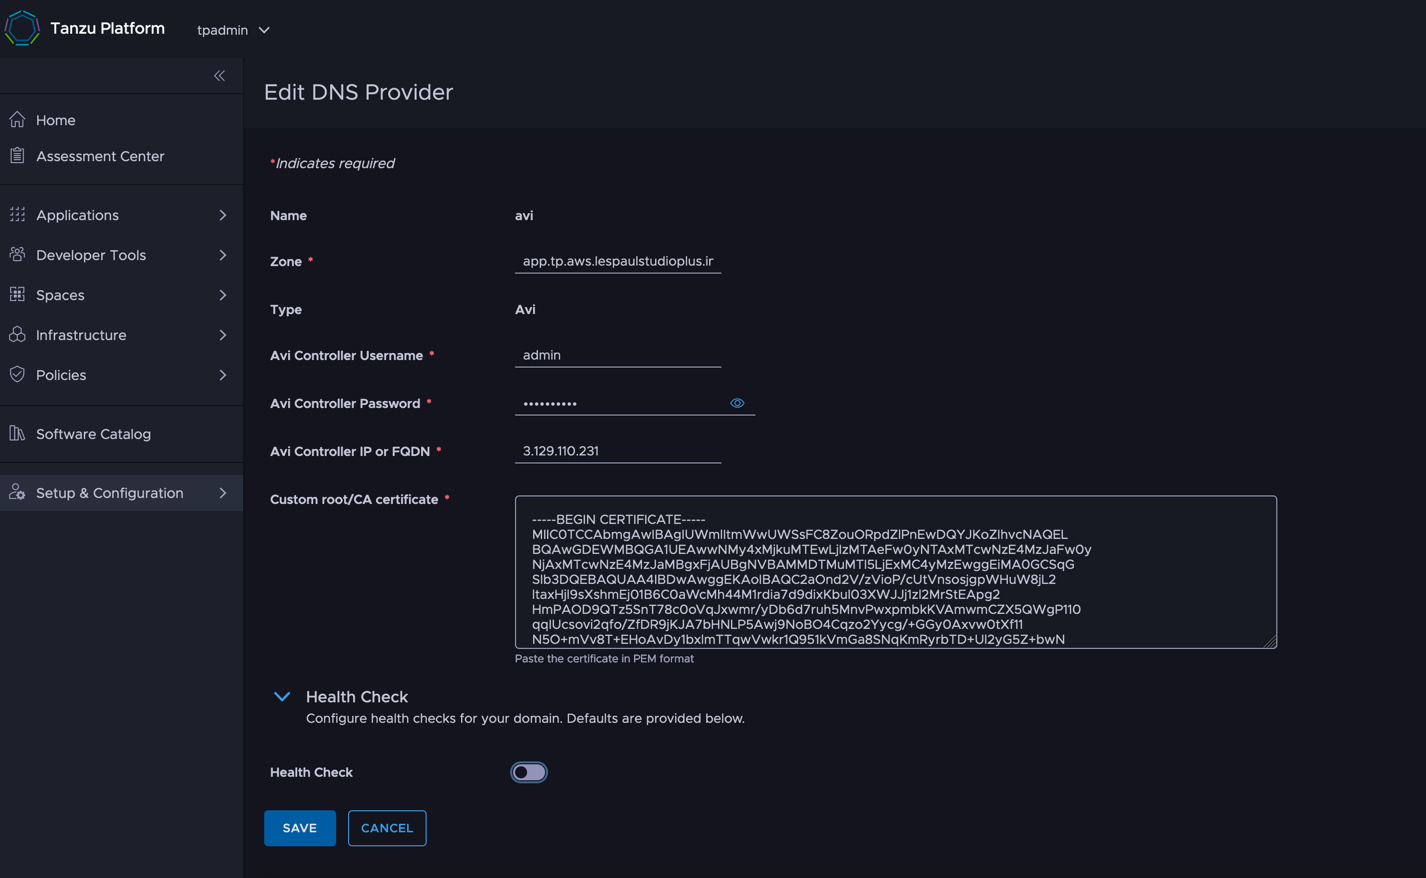
After registering, update the DNS Provider value in [Setup & Configurations] > [Networking] > [Domains].
In this state, deploy an app as in the earlier article. After deployment, querying DNS for the app domain returns the correct IP address:
mh013301@PJQ72XCV5C app % nslookup busy-penguin.app.tp.aws.lespaulstudioplus.info 18.221.33.160
Server:		18.221.33.160
Address:	18.221.33.160#53

Name:	busy-penguin.app.tp.aws.lespaulstudioplus.info
Address: 192.168.251.40
On the AVI side, [Applications] > [GSLB Services] shows the name-resolution info.
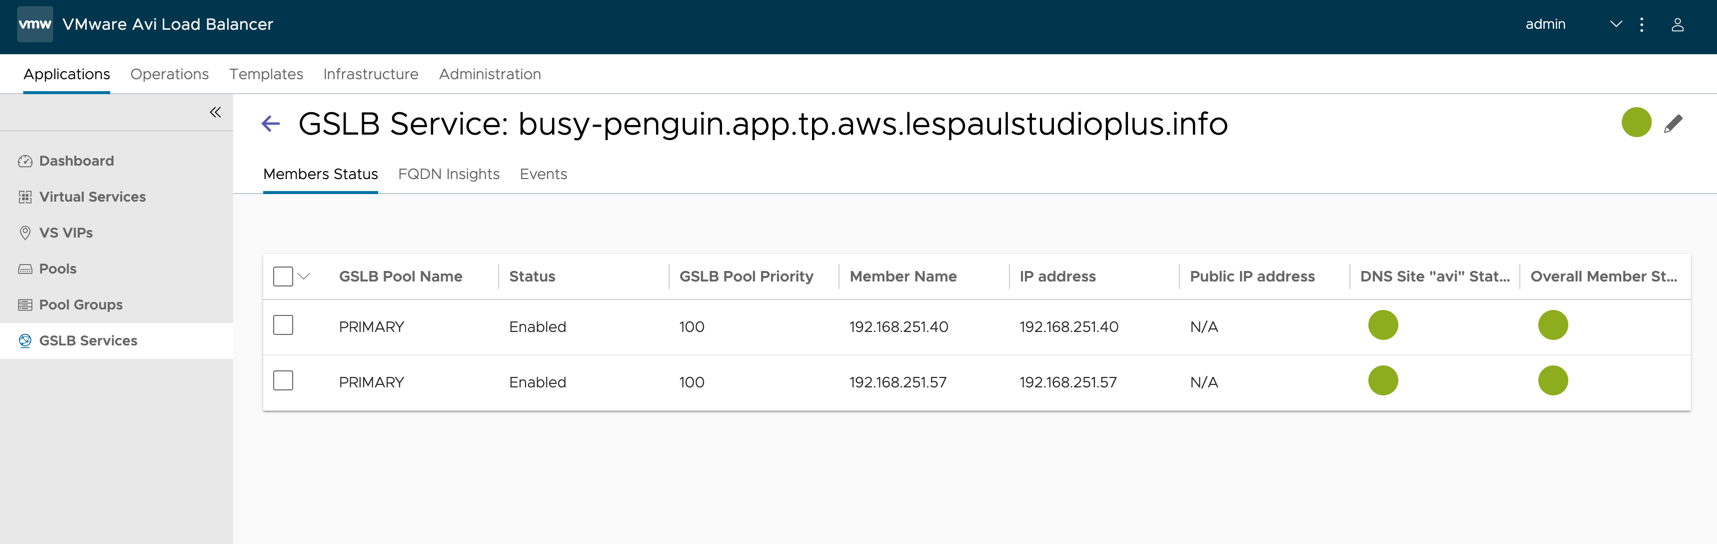
Limited to when two or more clusters exist within the Availability Target, let's change the Space settings to set Replica to 2. This deploys the application across two clusters.
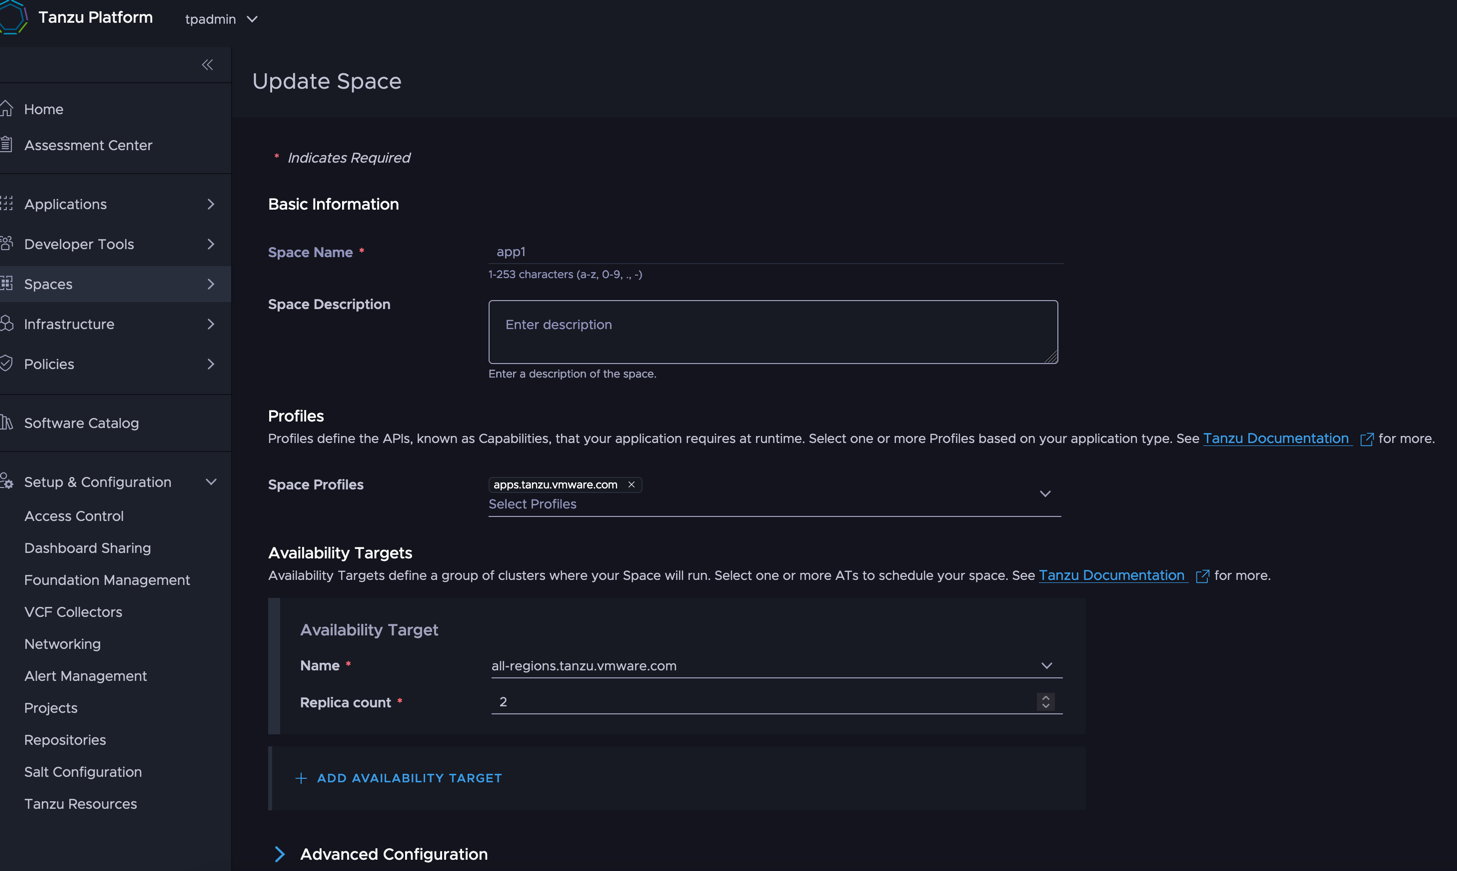
AVI then load-balances the DNS responses. You can see the nslookup results changing:
mh013301@PJQ72XCV5C app % nslookup busy-penguin.app.tp.aws.lespaulstudioplus.info 18.221.33.160
Server:		18.221.33.160
Address:	18.221.33.160#53

Name:	busy-penguin.app.tp.aws.lespaulstudioplus.info
Address: 192.168.251.57

mh013301@PJQ72XCV5C app % nslookup busy-penguin.app.tp.aws.lespaulstudioplus.info 18.221.33.160
Server:		18.221.33.160
Address:	18.221.33.160#53

Name:	busy-penguin.app.tp.aws.lespaulstudioplus.info
Address: 192.168.251.40
That's it for the AVI verification. AVI can additionally integrate with the external Route53, so registration all the way into public DNS is possible. (Might turn that into an article too.)
That covers automatic DNS registration.